Checklist
- 1. Understand the Publishing Process
- 2. Understand Google Play Policies
- 3. Test for Core App Quality
- 4. Determine Content Rating
- 5. Determine Country Distribution
- 6. Confirm Overall Size
- 7. Confirm Platform and Screen Ranges
- 8. Decide Free or Priced
- 9. Use In-app Billing
- 10. Set Prices for your Products
- 11. Start Localization
- 12. Prepare Promotional Graphics, Screenshots, and Videos
- 13. Build the Release-ready APK
- 14. Plan a Beta Release
- 15. Complete the Store Listing
- 16. Use Google Play Badges and Links
- 17. Final Checks and Publishing
- 18. Support Users after Launch
Before you publish your apps on Google Play and distribute them to users, you need to get the apps ready, test them, and prepare your promotional materials.
This page helps you understand the publishing process and get ready for a successful product launch on Google Play. It summarizes some of the tasks you'll need to complete before publishing your app on Google Play, such as creating a signed, release-ready application package (APK), understanding the requirements of the app, and creating the product page and graphic assets for each of your apps.
The preparation and publishing tasks are numbered to give you a rough idea of sequence. However, you can handle the tasks in any sequence that works for you or you can skip steps as appropriate.
As you move toward publishing, a variety of support resources are available to you. Relevant links are provided in each step.
1. Understand the Publishing Process
Before you begin the steps in this checklist, you should take a moment to read and understand the overall publishing workflow and become familiar with how the process works. In particular, you or your development team will need to prepare your apps for release using a process common to all Android apps. The Publishing workflow documents provide the details on how publishing works and how to get an APK ready for release.
Once you are familiar with publishing in general, continue reading to understand the issues that you should consider when publishing apps on Google Play.
Related resources
2. Understand Google Play Policies and Agreements
Make sure that you understand and follow the Google Play program policies that you accepted when registering. Google Play actively enforces the policies and any violations can lead to suspension of your apps or, for repeated violations, termination of your developer account.
Related resources
3. Test for Quality
Before you publish apps on Google Play, it's important to make sure that they meet the basic quality expectations for all Android apps, on all of the devices that you are targeting. You can check your app's quality by setting up a test environment and testing the app against a short set of quality criteria that applies to all apps. For complete information, see the Core App Quality guidelines.
If your app is targeting tablet devices, make sure that it delivers a rich, compelling experience to your tablet customers. See the Tablet App Quality guidelines for recommendations on ways to optimize your app for tablets.
If you plan to make your apps available to Google Play for Education, then you need to make sure they are suitable for a K-12 classroom and offer outstanding educational value. See the Education Guidelines for information on the characteristics your education apps should exhibit.
Related resources
4. Determine your App’s Content Rating
Google Play requires you to set a content rating for your app, which informs Google Play users of its maturity level. Before you publish, you should confirm what rating level you want to use. The available content rating levels are:
-
Everyone
-
Low maturity
-
Medium maturity
-
High maturity
On their Android devices, Android users can set the desired maturity level for browsing. Google Play then filters apps based on the setting, so the content rating you select can affect the app's distribution to users. You can assign (or change) the content rating for your apps in the Developer Console, no changes are required in your app binary.
Related resources
5. Determine Country Distribution
Google Play lets you control what countries and territories your apps are distributed to. For the widest reach and the largest potential customer base, you’d normally want to distribute to all available countries and territories. However, because of business needs, app requirements, or launch dependencies, you might want to exclude one or more countries from your distribution.
It's important to determine the exact country distribution early, because it can affect:
-
The need for localized resources in the app.
-
The need for a localized app description in the Developer Console.
-
Legal requirements for the app that may be specific to certain countries.
-
Time zone support, local pricing, and so on.
With your target countries in mind, you should assess your localization needs, both in your apps and in their Google Play listings details, and start the work of localization well in advance of your target launch date.
See Localization Checklist for key steps and considerations in the localization process.
Related resources
6. Confirm the App's Overall Size
The overall size of your app can affect its design and how you publish it on Google Play. Currently, the maximum size for an APK published on Google Play is 50 MB. If your app exceeds that size, or if you want to offer a secondary download, you can use APK Expansion Files, which Google Play will host for free on its server infrastructure and automatically handle the download to devices.
-
The maximum size for an APK published on Google Play is 50 MB.
-
You can use up to two (2) APK Expansion Files, each up to 2GB in size, for each APK.
Using APK Expansion files is a convenient, cost-effective method of distributing large apps. However, the use of APK Expansion Files requires some changes in your app binary, so you will need to make those changes before creating your release-ready APK.
To minimize the size of your app binary, make sure that you run the Proguard tool or similar obfuscator on your code when building your release-ready APK.
Related resources
7. Confirm the App's Platform and Screen Compatibility Ranges
Before publishing, it's important to make sure that your apps are designed to run properly on the Android platform versions and device screen sizes that you want to target.
From an app-compatibility perspective, Android platform versions are defined by API level. You should confirm the minimum version that your app is compatible with <minSdkVersion>, as that will affect its distribution to Android devices once it is published.
For screen sizes, you should confirm that the app runs properly and looks good on the range of screen sizes and pixel densities that you want to support. You should follow the advice provided in Supporting Multiple Screens to provide scalable support for multiple screen sizes. However, if you have been unable to do so, declare the minimum screen-size supported by your apps using <supports-screens>. Google Play will then restrict the availability of your apps accordingly, making them available to devices with the declared screen size or large.
To get a better understanding of the current device penetration of Android platform versions and screen sizes across all Android devices, see the Device Dashboard charts.
Related resources
8. Decide Whether your App will be Free or Priced
On Google Play, you can publish apps as free to download or priced. Free apps can be downloaded by any Android user in Google Play. Paid apps can be downloaded only by users who are in a country that supports paid downloads and have registered a form of payment in Google Play, such as a credit card or Direct Carrier Billing.
Deciding whether you apps will be free or paid is important because, on Google Play, free apps must remain free.
-
Once you publish an app as a free app, you cannot change it to being a priced app. However, you can still sell in-app products and subscriptions through Google Play's In-app Billing service.
-
If you publish your app as a priced app, you can change it at any time to be a free app (but cannot then change it back to priced). You can also sell in-app products and subscriptions.
If your app is be priced, or if you'll be selling in-app products, you need to set up a Google payments merchant account before you can publish.
Related resources
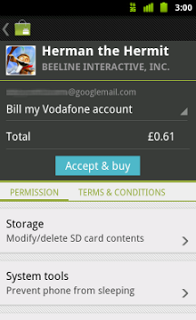
9. Consider using In-app Billing or Android Pay
Google Play In-app Billing lets you sell digital content in your applications. You can use the service to sell a wide range of content, including downloadable content such as media files or photos, and virtual content such as game levels or potions. In-app Billing service lets you sell one-time purchases and subscriptions from inside your app. This can help you to monetize the app over its installed lifetime.
Android Pay enables simple and secure purchases of physical goods and services in your app, such as clothing, food delivery or movie tickets
If your are looking for more ways to monetize your app and build engagement, you should consider In-app Billing or Android Pay. These services have become very popular with both users and developers. To use In-app Billing or Android Pay, you need to make changes to your app binary, so you will need to complete and test your implementation before creating your release-ready APK.
Related resources
10. Set Prices for your Products
If your apps is priced or you’ll sell in-app or physical products, Google Play lets you set prices for your products in a variety of currencies, for users in markets around the world. You can set prices individually in different currencies, so you have the flexibility to adjust your price according to market conditions and exchange rates.
Before you publish, consider how you’ll price your products and what your prices will be in various currencies. Later, you can set prices in all available currencies through the Developer Console.
Related resources
11. Start Localization
With your country targeting in mind, it's a good idea to assess your localization needs, ensure your apps are internationalized, and start the work of localizing well in advance of your target launch date.
In addition to your application design, there are at least three aspects of localization to consider:
-
Localizing the strings, images, and other resources in your apps.
-
Localizing your apps’ store listing details on Google Play.
-
Localizing the apps’ graphic assets, screenshots, and videos that accompany your store listing.
See Localization Checklist for key steps and considerations in the localization process.
To localize your store listing, first create and finalize your app title, description, and promotional text. Collect and send all of these for localization. You can optionally translate the "Recent Changes" text for app updates as well. Later you can add your localized listing details in the Developer Console, or you can choose to let Google Play auto-translate your listing details into the languages you support.
A key part of making your app listing attractive to a global customer base is creating localized versions of your promotional graphics, screenshots and videos. For example, your app's feature graphic might include text that should be translated, for maximum effectiveness. You can create different versions of your promotional graphics for each language and upload them to the Developer Console. If you offer a promotional video, you can create localized versions of it and then add a link to the correct localized video for each language you support.
When your translations are complete, move them into your app resources as needed and test that they are loaded properly. Save your app's translated listing details for later, when you upload assets and configure the store listing.
Related resources
12. Prepare Promotional Graphics, Screenshots, and Videos
When you publish on Google Play, you can supply a variety of high-quality graphic assets to showcase your app or brand. After you publish, these appear on your store listing page, search results, and elsewhere. These graphic assets are key parts of a successful store listing page that attracts and engages users, so you should consider having a professional produce them for you. Screenshots and videos are also very important, because they show how your apps look, how they’re used or played, and what makes them different.
All of your graphic assets should be designed so that they are easy to see and highlight your apps or brand in a colorful, interesting way. The assets should reference the same logo and icon as users will find in the All Apps launcher once they have downloaded the app. Your graphic assets should also fit in well with the graphic assets of all the apps you publish, which will be also be displayed to users on your store listing page.
To help you market your apps more effectively to a global audience, Google Play lets you create localized versions of your promotional graphics, screenshots, and videos and upload them to the Developer Console. When a user visits your app's store listing, Google Play displays the promotional graphic, screenshots, and video that you've provided for the user's language.
To localize your promotional graphics, you can translate any embedded text, use different imagery or presentation, or change your marketing approach to best address the needs of users in specific languages. For example, if your feature or promotional graphic includes an embedded product name or tag line, you can translate that text and add it to a localized version of the promotional graphic.
Because your localized graphic assets and videos are so important, you should get started on creating and localizing them well in advance of your target publishing date.
Related resources
13. Build and Upload the Release-ready APK
When you are satisfied that your apps meet your UI, compatibility, and quality requirements, you can build the release-ready versions of the apps. You upload the release-ready APKs to your Developer Console and distribute to users.
The process for preparing a release-ready APK is the same for all apps, regardless of how they are distributed. Generally the process includes basic code cleanup and optimization, building and signing with your release key, and final testing.
For complete details on how to create a release-ready version of your app, read Preparing for Release.
Once you have the release-ready APKs in hand, you can upload them to the Developer Console. If necessary, you can replace an APK with a more recent version before publishing.
14. Plan a Beta Release
Easy beta testing
Google Play lets you set up groups of alpha and beta testers, anywhere around the world. Check out this powerful feature next time you sign in to the Developer Console.
Before launching your apps, it's always valuable to get real-world feedback from users — even more so when you are launching new apps. It's highly recommended that you distribute a pre-release version of your app to users across your key markets and provide an easy means for them to provide feedback and report bugs.
Google Play can help you set up a beta program for your app. After you sign in to your Developer Console and have upload your APKs, you can set up groups of users for alpha and beta testing the apps. You can start with a small group of alpha testers, then move to a larger group of beta testers. Once users are added, they access your app's store listing and install the app. Users on alpha or beta versions cannot leave reviews or ratings, so there is no risk to your rating on Google Play. You need to arrange a mechanism for any testing feedback to be delivered - such as a Google Forum or Google+.
The feedback you receive will help you adjust your UI, translations, and store listing to ensure a great experience for users.
15. Complete the Apps’ Store Listing
On Google Play, your apps’ product information is shown to users on their store listing pages, the pages that users visit to learn more about your apps and the pages from which they will decide to purchase or download your apps, on their Android devices or on the web.
Google Play gives you a variety of ways to promote your apps and engage with users on your store listing pages, from colorful graphics, screenshots, and videos to localized descriptions, release details, and links to your other apps. As you prepare to publish your apps, make sure that you take advantage of all that your product detail pages can offer, making your apps as compelling as possible to users.
You should begin planning your product pages in advance of your target launch date, arranging for localized description, high-quality graphic assets, screenshots and video, and so on.
As you get near your target publishing date, you should become familiar with all the fields, options, and assets associated with the store listing configuration page in the Developer Console. As you collect the information and assets for the page, make sure that you can enter or upload it to the Developer Console, until the page is complete and ready for publishing.
After you've set your apps’ geographic targeting in the Developer Console, remember to add your localized store listing, promotional graphics, and so on, for all of the languages that you support.
If your app is targeting tablet devices, make sure to include at least one screenshot of the app running on a tablet, and highlight your apps’ support for tablets in the app description, release notes, promotional campaigns, and elsewhere.
Related resources
16. Use Google Play Badges and Links in your Promotional Campaigns
Google Play badges give you an officially branded way of promoting your apps to Android users. Use the Google Play Badge generator to quickly create badges to link users to your products from web pages, ads, reviews, and more. You can also use special link formats to link directly to your store listing page, to a list of your products, or to search results.
To help your apps get traction after launch, it's strongly recommended that you support launch with a promotional campaign that announces your product through many channels as possible, in as many countries as possible. For example, you can promote a launch using ad placements, social network or blog posts, video and other media, interviews and reviews, or any other channels available.
Related resources
17. Final Checks and Publishing
When you think you’re ready to publish, sign in to the Developer Console and take a few moments for a few final checks.
Make sure that:
-
Your developer profile has the correct information and is linked to the proper Google payments merchant account (if you’re selling products).
-
You have the right version of the apps uploaded.
-
All parts of your store listing are ready, including all graphic assets, screenshots, video, localized descriptions, and so on.
-
You have set your app's pricing to free or priced.
-
You have set country (and carrier) targeting and priced your products (if appropriate) in buyer currencies
-
"Compatible devices" shows that your apps are reaching the devices that you’re targeting. If not, you should check with your development team on the apps’ requirements and filtering rules.
-
You’ve provided the correct link to your website and the correct support email address.
-
Your apps don’t violate content policy guidelines.
-
You’ve acknowledged that your apps meets the guidelines for Android content on Google Play and also US export laws.
Your apps are now ready to publish!
If you’re releasing an update, make sure to read the requirements for publishing updates.
When you’re ready, click the Publish button in the Developer Console. Within a few hours, your apps will become available to users and your product page will appear in Google Play for browsing, searching, or linking from your promotional campaigns.
Related resources
18. Support Users after Launch
After you publish apps or app updates, it's crucial for you to support your customers. Prompt and courteous support can provide a better experience for users that results in better ratings and more positive reviews for your products. Users are likely to be more engaged with your app and recommend it if you’re responsive to their needs and feedback. This is especially true after publishing if you’re using a coordinated promotional campaign.
There are a number of ways that you can keep in touch with users and offer them support. The most fundamental is to provide your support email address on your store listing pages. Beyond that, you can provide support in any way you choose, such as a forum, mailing list, or a Google+ page. The Google Play team provides user support for downloading, installing. and payments issues, but issues that fall outside of these topics will be in your domain. Examples of issues you can support include: feature requests, questions about using the apps, and questions about compatibility settings.
After publishing, plan to:
-
Check your ratings and reviews frequently on your apps’ store listing pages. Watch for recurring themes that could signal bugs or other issues.
-
Be mindful of new Android platform version launches, as compatibility settings for your apps might need to be updated.
-
Put a link to your support resources on your website and set up any other support such as forums.
-
Provide an appropriate support email address on your store listing pages and respond to users when they take the time to email you.
-
Beyond the automatic refund window offered by Google Play, be generous with your own refund policy, as satisfied users will be more likely to purchase in the future.
-
Acknowledge and fix issues in your apps. It helps to be transparent and list known issues on your store listing pages proactively.
-
Publish updates as frequently as you’re able, without sacrificing quality or annoying users with too-frequent updates.
-
With each update, make sure to provide a summary of what's changed. You can enter this information in the Developer Console. Users will read it and appreciate that you are serious about improving the quality of your apps.