In this document
Key Classes
Related Samples
As users connect their televisions, home theater systems and music players with wireless technologies, they want to be able to play content from Android apps on these larger, louder devices. Enabling this kind of playback can turn your one-device, one-user app into a shared experience that delights and inspires multiple users.
The Android media router APIs are designed to enable media display and playback on these secondary devices. There are two main approaches you can use to play content using these APIs:
- Remote Playback — This approach uses the receiving device to handle the content data retrieval, decoding, and playback, while an Android device in the user's hand is used as a remote control. This approach is used by Android apps that support Google Cast.
- Secondary Output — With this approach, your app retrieves, renders and streams video or music directly to the receiving device. This approach is used to support Wireless Display output on Android.
This guide explains how your app can deliver media to secondary playback devices using either of these approaches.
Overview
The media router APIs enable a broad range of media output to playback equipment connected to Android devices through wireless and wired means. To enable these connections, the media router framework abstracts the logical paths for audio and video output for an Android device. This architecture allows your app to quickly channel media content to connected playback devices such as home theaters and sound systems that provide Android media route support.
In order to use this framework within your app, you must get an instance
of the MediaRouter framework object and attach a MediaRouter.Callback object to listen for events in
available media routes. Content channelled through a media route passes through the route's
associated MediaRouteProvider (except in a few special cases,
such as a Bluetooth output device). The following diagram provides a high-level view of the
classes your app can use to play content with the media router framework.
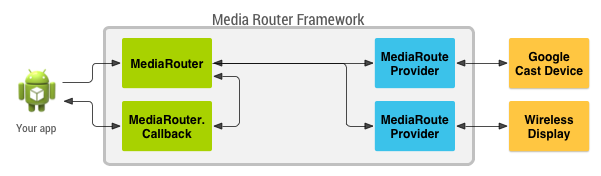
Figure 1. Overview of key media router classes used by apps.
Manufacturers of media playback hardware that is not supported by the media router framework
can add support for their devices by implementing a
MediaRouteProvider and distributing it as an application.
For more information on implementing a media route provider, see the MediaRouteProvider reference documentation and the v7-mediarouter
support library sample <sdk>/extras/android/compatibility/v7/mediarouter.
Media router packages
The media router APIs are provided as part of the Android Support Library version 18 and
higher, in the
v7-mediarouter support
library. Specifically, you should use the classes in the android.support.v7.media
package for media router functions. These APIs are compatible with devices running Android 2.1
(API level 7) and higher.
Caution: There is another set of media router APIs provided in the
android.media that have been superseded by the v7-mediarouter support library.
You should not use the android.media classes for media router functions.
In order to use the android.support.v7.media media router classes, you must add
the v7-mediarouter
support library package to your app development project. For more
information on adding support libraries to your app development project, see
Support Library Setup.
Cast User Interface
Android apps that implement the media router API should include a Cast button as part of their user interface, to allow users to select a media route to play media on a secondary output device. The media router framework provides a standard interface for the button, which you should use to help users recognize and use the feature in your app. Figure 2 illustrates how the Cast button should appear in an app.
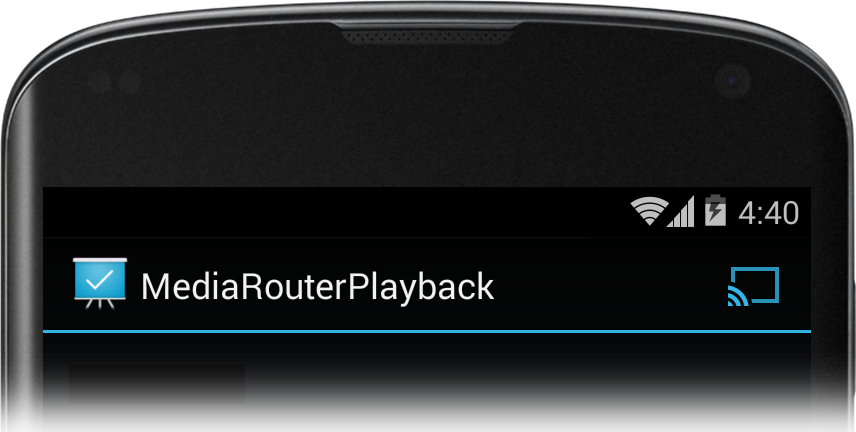
Figure 2. A Cast button shown on the right side of the action bar.
Caution: When implementing an activity that provides a media router interface
you must extend either ActionBarActivity
or FragmentActivity from the Android Support Library, even if
your android:minSdkVersion is API 11 or higher.
Cast button
The recommended way to implement the Cast button user interface is to extend your activity
from ActionBarActivity and use the onCreateOptionsMenu() method to add an options menu.
The Cast button must use the MediaRouteActionProvider class
as its action:
<?xml version="1.0" encoding="utf-8"?>
<menu xmlns:android="http://schemas.android.com/apk/res/android"
      xmlns:app="http://schemas.android.com/apk/res-auto"
      >

    <item android:id="@+id/media_route_menu_item"
        android:title="@string/media_route_menu_title"
        app:actionProviderClass="android.support.v7.app.MediaRouteActionProvider"
        app:showAsAction="always"
    />
</menu>
For more information about implementing the action bar in your app, see the Action Bar developer guide.
Once you have added the Cast button to your user interface, you must attach a media route selector object. Building a selector is discussed in the next section.
If you do not want a menu in your action bar, you can also add a Cast button to your app using
MediaRouteButton. If you choose this approach, you should add
this button to your app's action bar according to the
Google Cast Design
Checklist. You must also attach a media route selector to the button using the
setRouteSelector() method.
For guidelines on incorporating the Cast button into your application, review the Google Cast Design Checklist.
Media route selector
When a user presses the Cast button, the media router framework looks for available media routes and presents a list of choices to the user, as shown in figure 3.
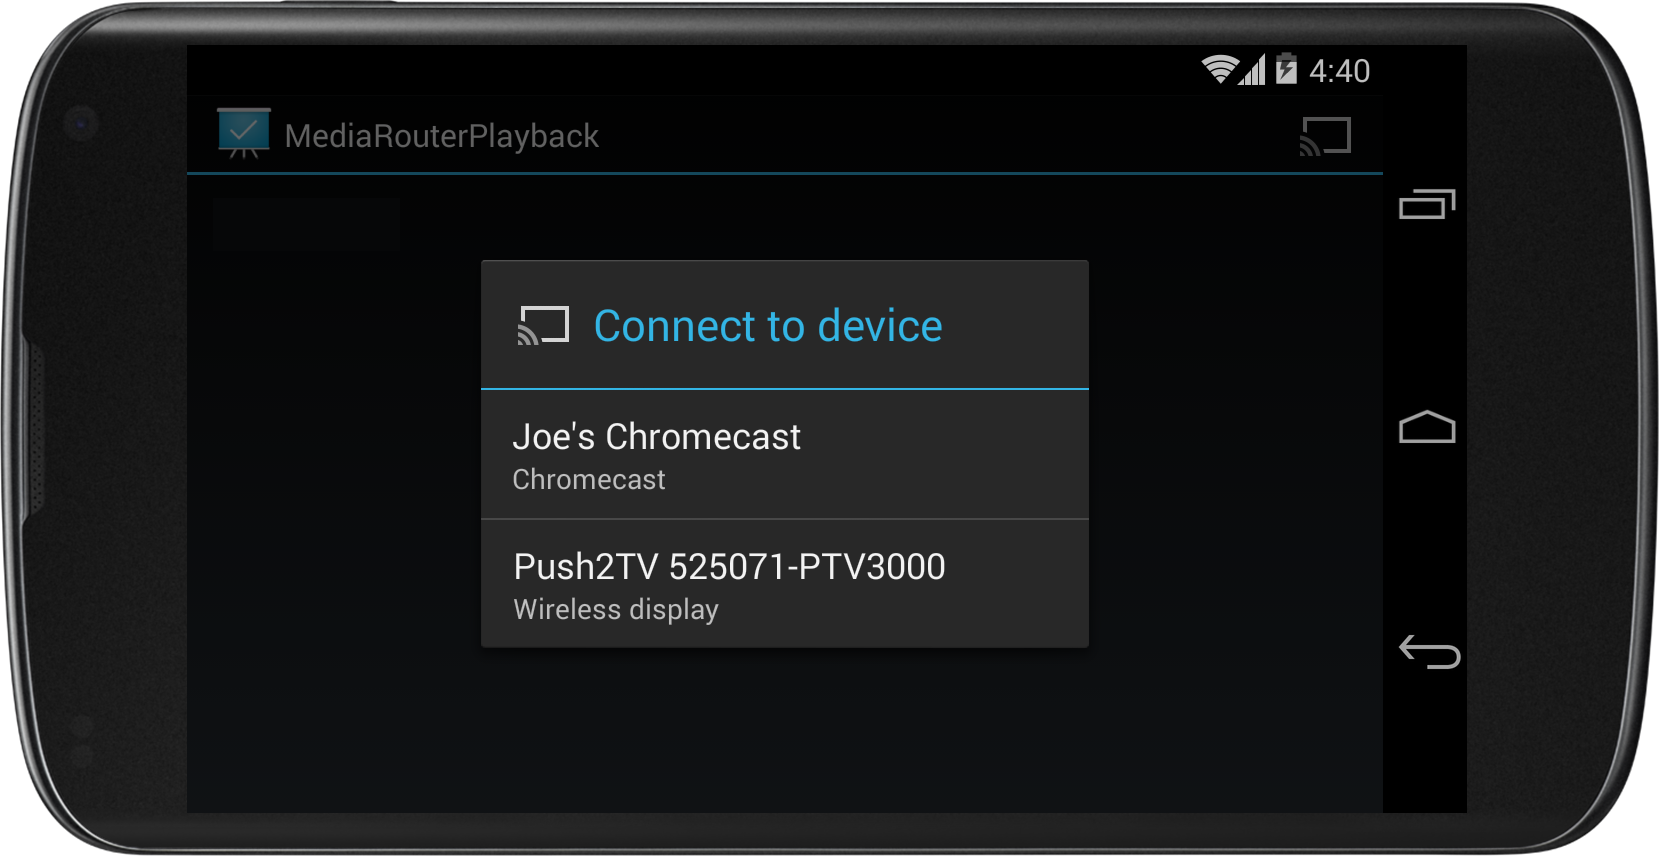
Figure 3. A list of available media routes, shown after pressing the Cast button.
The types of media routes that appear on this list—Remote Playback, Secondary
Output or others—are defined by your app.You define these type by creating a MediaRouteSelector, which accepts MediaControlIntent objects provided by the framework and other media
route providers created by you or other developers. The framework-provided route categories are as
follows:
CATEGORY_LIVE_AUDIO— Output of audio to a secondary output device, such as a wireless-enabled music system.CATEGORY_LIVE_VIDEO— Output of video to a secondary output device, such as Wireless Display devices.CATEGORY_REMOTE_PLAYBACK— Play video or audio on a separate device that handles media retrieval, decoding, and playback, such as Chromecast devices.
When creating a MediaRouteSelector object, use the
MediaRouteSelector.Builder class to create the object and set
the media playback categories (control categories), as shown
in the following code sample:
public class MediaRouterPlaybackActivity extends ActionBarActivity {
    private MediaRouteSelector mSelector;

    @Override
    protected void onCreate(Bundle savedInstanceState) {
        super.onCreate(savedInstanceState);
        setContentView(R.layout.activity_main);

        // Create a route selector for the type of routes your app supports.
        mSelector = new MediaRouteSelector.Builder()
                // These are the framework-supported intents
                .addControlCategory(MediaControlIntent.CATEGORY_LIVE_AUDIO)
                .addControlCategory(MediaControlIntent.CATEGORY_LIVE_VIDEO)
                .addControlCategory(MediaControlIntent.CATEGORY_REMOTE_PLAYBACK)
                .build();
    }
}
The media router framework uses this selector object to provide an interface for selecting
media routes that your app supports, as shown in figure 3. Once you have defined this selector,
you attach it to the MediaRouteActionProvider object associated
with the Cast menu item, as shown in the following code sample:
@Override
public boolean onCreateOptionsMenu(Menu menu) {
    super.onCreateOptionsMenu(menu);

    // Inflate the menu and configure the media router action provider.
    getMenuInflater().inflate(R.menu.sample_media_router_menu, menu);

    // Attach the MediaRouteSelector to the menu item
    MenuItem mediaRouteMenuItem = menu.findItem(R.id.media_route_menu_item);
    MediaRouteActionProvider mediaRouteActionProvider =
            (MediaRouteActionProvider)MenuItemCompat.getActionProvider(
            mediaRouteMenuItem);
    mediaRouteActionProvider.setRouteSelector(mSelector);

    // Return true to show the menu.
    return true;
}
Once you have made these changes to your app, you might expect the Cast button to appear in your activity. Alas, it does not (unless your device is already paired with a Wireless Display). In most cases, you must also connect with the media route framework, which is discussed in the next section.
Connecting to Media Routes
In order to connect to a media route selected by the user, your app must obtain the MediaRouter framework object and then attach a MediaRouter.Callback object. The callback object receives messages
from the media router framework when a route is selected, changed, or disconnected by the user.
To obtain an instance of the MediaRouter framework object,
call MediaRouter.getInstance()
from the onCreate() method of an activity that supports
the media router API.
Note: The MediaRouter object is a singleton
that is maintained by the framework. However, once your application obtains an instance of the
object you must retain that instance until your application terminates to prevent it from being
garbage collected.
Creating a MediaRouter callback
The media router framework communicates with an app through a callback object that
you attach to the MediaRouter framework object. An app
that uses the media router framework must extend the MediaRouter.Callback object in order to receive messages when a
media route is connected.
There are several methods in the callback that you can override to receive information about
media router events. At minimum, your implementation of the MediaRouter.Callback class should override the following
methods:
onRouteSelected()— Called when the user connects to a media router output device.onRouteUnselected()— Called when the user disconnects from a media router output device.onRoutePresentationDisplayChanged()— Called when the presentation display changes its display metrics, such as changing from 720 pixel to 1080 pixel resolution.
The methods of your MediaRouter.Callback
implementation are the first opportunity to determine if the connected route is a remote playback
device, such as Chromecast, or a secondary output device, such as a Wireless Display device.
If your app supports both device types, then your implementation should branch here, as
shown in this sample code:
private final MediaRouter.Callback mMediaRouterCallback =
        new MediaRouter.Callback() {

    @Override
    public void onRouteSelected(MediaRouter router, RouteInfo route) {
        Log.d(TAG, "onRouteSelected: route=" + route);

        if (route.supportsControlCategory(
            MediaControlIntent.CATEGORY_REMOTE_PLAYBACK)){
            // remote playback device
            updateRemotePlayer(route);
        } else {
            // secondary output device
            updatePresentation(route);
        }
    }

    @Override
    public void onRouteUnselected(MediaRouter router, RouteInfo route) {
        Log.d(TAG, "onRouteUnselected: route=" + route);

        if (route.supportsControlCategory(
            MediaControlIntent.CATEGORY_REMOTE_PLAYBACK)){
            // remote playback device
            updateRemotePlayer(route);
        } else {
            // secondary output device
            updatePresentation(route);
        }
    }

    @Override
    public void onRoutePresentationDisplayChanged(
            MediaRouter router, RouteInfo route) {
        Log.d(TAG, "onRoutePresentationDisplayChanged: route=" + route);

        if (route.supportsControlCategory(
            MediaControlIntent.CATEGORY_REMOTE_PLAYBACK)){
            // remote playback device
            updateRemotePlayer(route);
        } else {
            // secondary output device
            updatePresentation(route);
        }
    }
}
After defining your callback object for the media router, you still need to attach it to the main media router framework object. The next section discusses the appropriate way to attach your callbacks for media routes.
Attaching a callback to MediaRouter
Since media routes are a shared interface, your app must attach and detach your
MediaRouter.Callback object as your app starts up and shuts
down. To accomplish this, you must add and remove your app's
callback object from the media router framework as part of your app's activity lifecycle. This
approach allows other apps to make use of media route outputs while your app
is in the background or not running.
Note: If you are writing a music playback app and want to allow music to play
while your app is in the background, you must build a Service for playback
and connect that service and it's lifecycle to the media router framework.
The following code sample demonstrates how to use the lifecycle methods to appropriately add and remove your app's media router callback object:
public class MediaRouterPlaybackActivity extends ActionBarActivity {
    private MediaRouter mMediaRouter;
    private MediaRouteSelector mSelector;
    private Callback mMediaRouterCallback;

    // your app works with so the framework can discover them.
    @Override
    protected void onCreate(Bundle savedInstanceState) {
        super.onCreate(savedInstanceState);
        setContentView(R.layout.activity_main);

        // Get the media router service.
        mMediaRouter = MediaRouter.getInstance(this);
        ...
    }

    // Add the callback on start to tell the media router what kinds of routes
    // your app works with so the framework can discover them.
    @Override
    public void onStart() {
        mMediaRouter.addCallback(mSelector, mMediaRouterCallback,
                MediaRouter.CALLBACK_FLAG_REQUEST_DISCOVERY);
        super.onStart();
    }

    // Remove the selector on stop to tell the media router that it no longer
    // needs to discover routes for your app.
    @Override
    public void onStop() {
        mMediaRouter.removeCallback(mMediaRouterCallback);
        super.onStop();
    }
    ...
}
You should add and remove the media router callback only in the onStart() and onStop()
lifecycle methods. Do not include these calls in the onResume() or onPause() methods.
Note: The media route framework also provides a
MediaRouteDiscoveryFragment class, which takes care of adding and
removing the callback for an activity.
Now when you run your application, you should see a Cast button appear in your activity. When you touch the button, a route selection dialog appears as shown in figure 3, allowing your user to select an available media route. Make sure you have a supported device available on your local network when testing this interface.
Note: In order for Wireless Display routes to show up in the media route selection dialog, users must enable this option in the Settings app. The option is under the Display category and is called Cast screen on Android 4.4 (KitKat) and higher devices and Wireless Display on Android 4.2.x (Jelly Bean) devices. For more information on enabling this feature see this Wireless display support page.
Remote Playback
The remote playback approach sends control commands to a secondary device to initiate playback and to control playback that is in progress (pause, rewind, fast-forward, volume up and down). Using this approach, the receiving device (such as a Chromecast) is responsible for retrieving and rendering content.
When your app supports this type of media route, you must create a RemotePlaybackClient object using a remote playback MediaRouter.RouteInfo object received through your app's
MediaRouter.Callback object. The following sample
code demonstrates a controller method that creates a new remote playback client and sends it a
video for playback:
private void updateRemotePlayer(RouteInfo route) {
    // Changed route: tear down previous client
    if (mRoute != null && mRemotePlaybackClient != null) {
        mRemotePlaybackClient.release();
        mRemotePlaybackClient = null;
    }

    // Save new route
    mRoute = route;

    // Attach new playback client
    mRemotePlaybackClient = new RemotePlaybackClient(this, mRoute);

    // Send file for playback
    mRemotePlaybackClient.play(Uri.parse(
            "http://archive.org/download/Sintel/sintel-2048-stereo_512kb.mp4"),
            "video/mp4", null, 0, null, new ItemActionCallback() {

            @Override
            public void onResult(Bundle data, String sessionId,
                    MediaSessionStatus sessionStatus,
                    String itemId, MediaItemStatus itemStatus) {
                logStatus("play: succeeded for item " + itemId);
            }

            @Override
            public void onError(String error, int code, Bundle data) {
                logStatus("play: failed - error:"+ code +" - "+ error);
            }
        });
    }
}
The RemotePlaybackClient class provides additional methods
for managing content playback. Here are a few of the key playback methods from the RemotePlaybackClient class:
play()— Play a specific media file, specified by aUri.pause()— Pause the currently playing media track.resume()— Continue playing the current track after a pause command.seek()— Move to a specific position in the current track.release()— Tear down the connection from your app to the remote playback device.
You can use these methods to attach actions to playback controls you provide in your app. Most of these methods also allow you to include a callback object so you can monitor the progress of the playback task or control request.
The RemotePlaybackClient class also supports queueing of
multiple media items for playback and management of the media queue. For a comprehensive sample
implementation of these features, see SampleMediaRouterActivity and its associated
classes in the v7 mediarouter support library sample
<sdk>/extras/android/compatibility/v7/mediarouter.
For additional information on using the Google Cast API for Chromecast devices, see the Google Cast developer documentation.
Secondary Output
The secondary output approach sends prepared media content to a connected secondary device for playback. Secondary devices can include televisions or wireless sound systems and can be attached through wireless protocols or wires, such as an HDMI cable. With this approach, your app is responsible for processing media content for playback (downloading, decoding, synchronization of audio and video tracks), while the secondary device only outputs the content in its final form.
Note: Using the secondary output display routes with the media router framework
requires classes that are available only in Android 4.2 (API level 17) and higher, specifically the
Presentation class. If you are building an app that supports both
remote playback and secondary output devices, you must include checks that disable this code
below the supported Android version level.
Creating a Presentation object
When using a secondary output display with the media router framework, you create a Presentation object that contains the content you want to show on that display. The
Presentation is extended from the Dialog class, so can
add layouts and views to a Presentation.
You should be aware that the Presentation object has its own
Context and
Resources,
separate from the app activity that created the object. Having a secondary
context is required, because the content of the Presentation is drawn on a
display that is separate from your app's display on the local Android device.
Specifically, the secondary display needs a separate context because it may need to load
resources based on its specific screen metrics.
The following code sample shows a minimal implementation of a
Presentation object, including a GLSurfaceView
object.
public class SamplePresentation extends Presentation {
    public SamplePresentation(Context outerContext, Display display) {
        super(outerContext, display);
    }

    @Override
    protected void onCreate(Bundle savedInstanceState) {
        super.onCreate(savedInstanceState);
        // Notice that we get resources from the context of the Presentation
        Resources resources = getContext().getResources();

        // Inflate a layout.
        setContentView(R.layout.presentation_with_media_router_content);

        // Add presentation content here:
        // Set up a surface view for visual interest
        mSurfaceView = (GLSurfaceView)findViewById(R.id.surface_view);
        mSurfaceView.setRenderer(new CubeRenderer(false));
    }
}
Creating a Presentation controller
In order to display a Presentation object, you should write a
controller layer that handles responses to the messages received by the MediaRouter.Callback object and manages the creation and
removal of the Presentation object. The controller layer should also handle
attaching presentations to a selected Display object, which represents the
separate physical display device chosen by the user. The controller layer can simply be a method
in the activity that supports a secondary display.
The following code sample shows a controller layer for a Presentation
implemented as a single method. This method handles dismissing invalid presentations when a
Display is unselected or disconnected, and creates the Presentation object when a display device is connected.
private void updatePresentation(RouteInfo route) {
    // Get its Display if a valid route has been selected
    Display selectedDisplay = null;
    if (route != null) {
        selectedDisplay = route.getPresentationDisplay();
    }

    // Dismiss the current presentation if the display has changed or no new
    // route has been selected
    if (mPresentation != null && mPresentation.getDisplay() != selectedDisplay) {
        mPresentation.dismiss();
            mPresentation = null;
    }

    // Show a new presentation if the previous one has been dismissed and a
    // route has been selected.
    if (mPresentation == null && selectedDisplay != null) {
        // Initialize a new Presentation for the Display
        mPresentation = new SamplePresentation(this, selectedDisplay);
        mPresentation.setOnDismissListener(
                new DialogInterface.OnDismissListener() {
                    // Listen for presentation dismissal and then remove it
                    @Override
                    public void onDismiss(DialogInterface dialog) {
                        if (dialog == mPresentation) {
                            mPresentation = null;
                        }
                    }
                });

        // Try to show the presentation, this might fail if the display has
        // gone away in the meantime
        try {
            mPresentation.show();
        } catch (WindowManager.InvalidDisplayException ex) {
            // Couldn't show presentation - display was already removed
            mPresentation = null;
        }
    }
}
Note: When the a user connects to a Wireless Display, the media router framework automatically provides a notification that it is displaying screen content on a connected device.