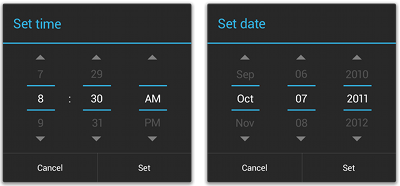
Android provides controls for the user to pick a time or pick a date as ready-to-use dialogs. Each picker provides controls for selecting each part of the time (hour, minute, AM/PM) or date (month, day, year). Using these pickers helps ensure that your users can pick a time or date that is valid, formatted correctly, and adjusted to the user's locale.
We recommend that you use DialogFragment to host each time or date
picker. The DialogFragment manages the dialog lifecycle for you and
allows you to display the pickers in different layout configurations,
such as in a basic dialog on handsets or as an embedded part of the layout on large screens.
Although DialogFragment was first added to the platform in Android 3.0 (API
level 11), if your app supports versions of Android older than 3.0—even as low as Android
1.6—you can use the DialogFragment class that's available in
the support library for backward
compatibility.
Note: The code samples below show how to create dialogs for a time
picker and date picker using the support
library APIs for DialogFragment. If your app's minSdkVersion is 11 or
higher, you can instead use the platform version of DialogFragment.
Creating a Time Picker
To display a TimePickerDialog using DialogFragment, you need to define a fragment class that extends DialogFragment and return a TimePickerDialog from the
fragment's onCreateDialog() method.
Note: If your app supports versions of Android older than 3.0, be sure you've set up your Android project with the support library as described in Setting Up a Project to Use a Library.
Extending DialogFragment for a time picker
To define a DialogFragment for a TimePickerDialog, you
must:
- Define the
onCreateDialog()method to return an instance ofTimePickerDialog - Implement the
TimePickerDialog.OnTimeSetListenerinterface to receive a callback when the user sets the time.
Here's an example:
public static class TimePickerFragment extends DialogFragment
                            implements TimePickerDialog.OnTimeSetListener {

    @Override
    public Dialog onCreateDialog(Bundle savedInstanceState) {
        // Use the current time as the default values for the picker
        final Calendar c = Calendar.getInstance();
        int hour = c.get(Calendar.HOUR_OF_DAY);
        int minute = c.get(Calendar.MINUTE);

        // Create a new instance of TimePickerDialog and return it
        return new TimePickerDialog(getActivity(), this, hour, minute,
                DateFormat.is24HourFormat(getActivity()));
    }

    public void onTimeSet(TimePicker view, int hourOfDay, int minute) {
        // Do something with the time chosen by the user
    }
}
See the TimePickerDialog class for information about the constructor
arguments.
Now all you need is an event that adds an instance of this fragment to your activity.
Showing the time picker
Once you've defined a DialogFragment like the one shown above,
you can display the time picker by creating an instance of the DialogFragment and calling show().
For example, here's a button that, when clicked, calls a method to show the dialog:
<Button
    android:layout_width="wrap_content"
    android:layout_height="wrap_content"
    android:text="@string/pick_time"
    android:onClick="showTimePickerDialog" />
When the user clicks this button, the system calls the following method:
public void showTimePickerDialog(View v) {
    DialogFragment newFragment = new TimePickerFragment();
    newFragment.show(getSupportFragmentManager(), "timePicker");
}
This method calls show() on a new instance of the DialogFragment defined above. The show() method requires an instance of FragmentManager and a unique tag name for the fragment.
Caution: If your app supports versions of Android lower than
3.0, be sure that you call getSupportFragmentManager() to acquire an instance of
FragmentManager. Also make sure that your activity that displays the
time picker extends FragmentActivity instead of the standard Activity class.
Creating a Date Picker
Creating a DatePickerDialog is just like creating a TimePickerDialog. The only difference is the dialog you create for the fragment.
To display a DatePickerDialog using DialogFragment, you need to define a fragment class that extends DialogFragment and return a DatePickerDialog from the
fragment's onCreateDialog() method.
Note: If your app supports versions of Android older than 3.0, be sure you've set up your Android project with the support library as described in Setting Up a Project to Use a Library.
Extending DialogFragment for a date picker
To define a DialogFragment for a DatePickerDialog, you
must:
- Define the
onCreateDialog()method to return an instance ofDatePickerDialog - Implement the
DatePickerDialog.OnDateSetListenerinterface to receive a callback when the user sets the date.
Here's an example:
public static class DatePickerFragment extends DialogFragment
                            implements DatePickerDialog.OnDateSetListener {

    @Override
    public Dialog onCreateDialog(Bundle savedInstanceState) {
        // Use the current date as the default date in the picker
        final Calendar c = Calendar.getInstance();
        int year = c.get(Calendar.YEAR);
        int month = c.get(Calendar.MONTH);
        int day = c.get(Calendar.DAY_OF_MONTH);

        // Create a new instance of DatePickerDialog and return it
        return new DatePickerDialog(getActivity(), this, year, month, day);
    }

    public void onDateSet(DatePicker view, int year, int month, int day) {
        // Do something with the date chosen by the user
    }
}
See the DatePickerDialog class for information about the constructor
arguments.
Now all you need is an event that adds an instance of this fragment to your activity.
Showing the date picker
Once you've defined a DialogFragment like the one shown above,
you can display the date picker by creating an instance of the DialogFragment and calling show().
For example, here's a button that, when clicked, calls a method to show the dialog:
<Button
    android:layout_width="wrap_content"
    android:layout_height="wrap_content"
    android:text="@string/pick_date"
    android:onClick="showDatePickerDialog" />
When the user clicks this button, the system calls the following method:
public void showDatePickerDialog(View v) {
    DialogFragment newFragment = new DatePickerFragment();
    newFragment.show(getSupportFragmentManager(), "datePicker");
}
This method calls show() on a new instance of the DialogFragment defined above. The show() method requires an instance of FragmentManager and a unique tag name for the fragment.
Caution: If your app supports versions of Android lower than
3.0, be sure that you call getSupportFragmentManager() to acquire an instance of
FragmentManager. Also make sure that your activity that displays the
time picker extends FragmentActivity instead of the standard Activity class.