Android Studio provides graphical tools for creating and managing Android projects, which contain everything that define your Android apps, from app source code to build configurations and test code. Each project contains one or more different types of modules, such as application modules, library modules, and test modules.
This guide explains how to create Android projects and different modules using Android Studio. For more information about the Android project structure and module types, read Managing Projects Overview.
Creating an Android Project
Android Studio makes it easy to create Android apps for several form factors, such as phone, tablet, TV, Wear, and Google Glass. The New Project wizard lets you choose the form factors for your app and populates the project structure with everything you need to get started.
Follow the steps in this section to create a project in Android Studio.
Step 1: Create a New Project
If you didn't have a project opened, Android Studio shows the Welcome screen. To create a new project, click New Project.
If you had a project opened, Android Studio shows the development environment. To create a new project, click File > New Project.
The next window lets you configure the name of your app, the package name, and the location of your project.
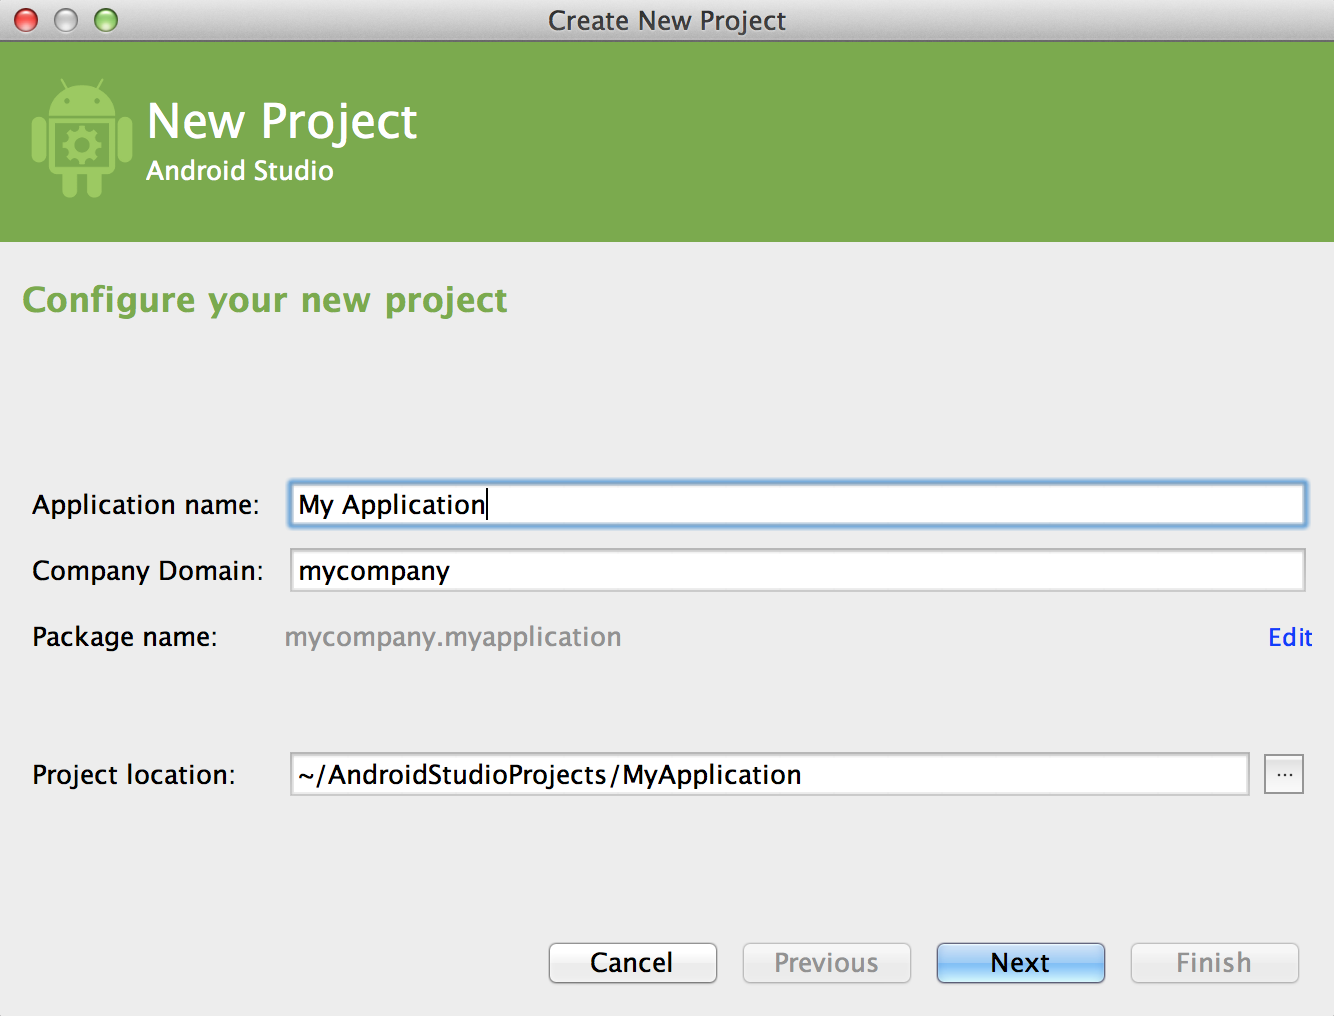
Figure 1. Choose a name for your project.
Enter the values for your project then click Next.
Step 2: Select Form Factors and API Level
The next window lets you select the form factors supported by your app, such as phone, tablet, TV, Wear, and Google Glass. The selected form factors become the application modules within the project. For each form factor, you can also select the API Level for that app. To get more information, click Help me choose.
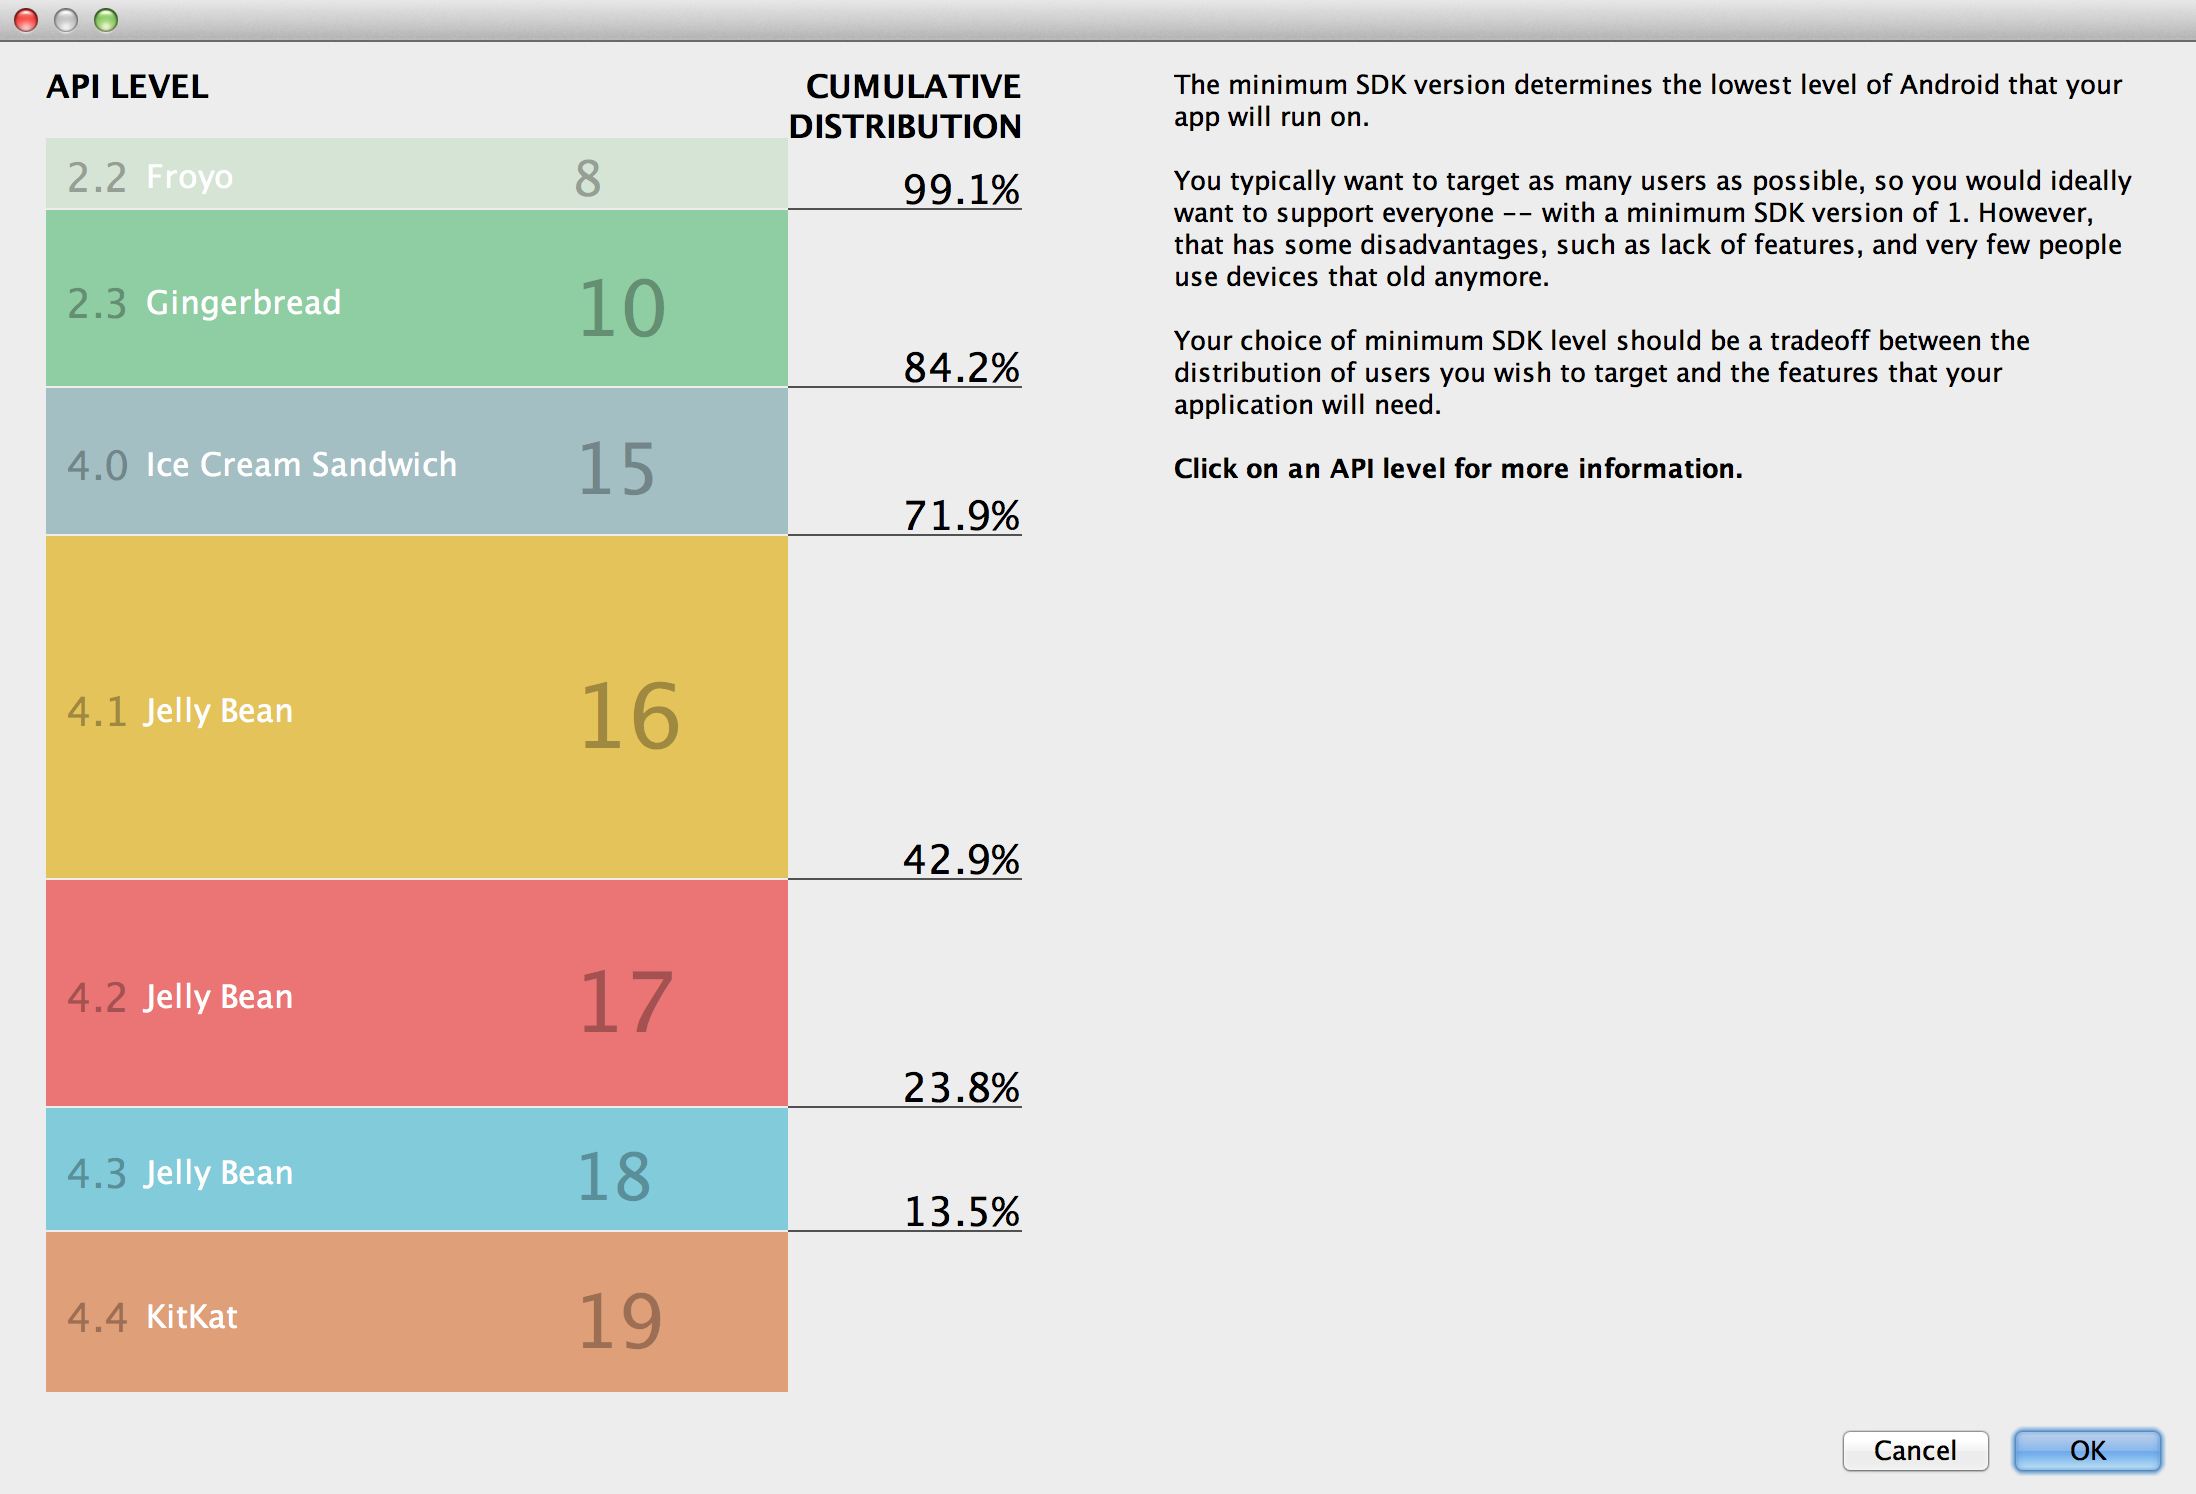
Figure 2. Select the API Level.
The API Level window shows the distribution of mobile devices running each version of Android, as shown in figure 3. Click on an API level to see a list of features introduced in the corresponding version of Android. This helps you choose the minimum API Level that has all the features that your apps needs, so you can reach as many devices as possible. Then click OK.
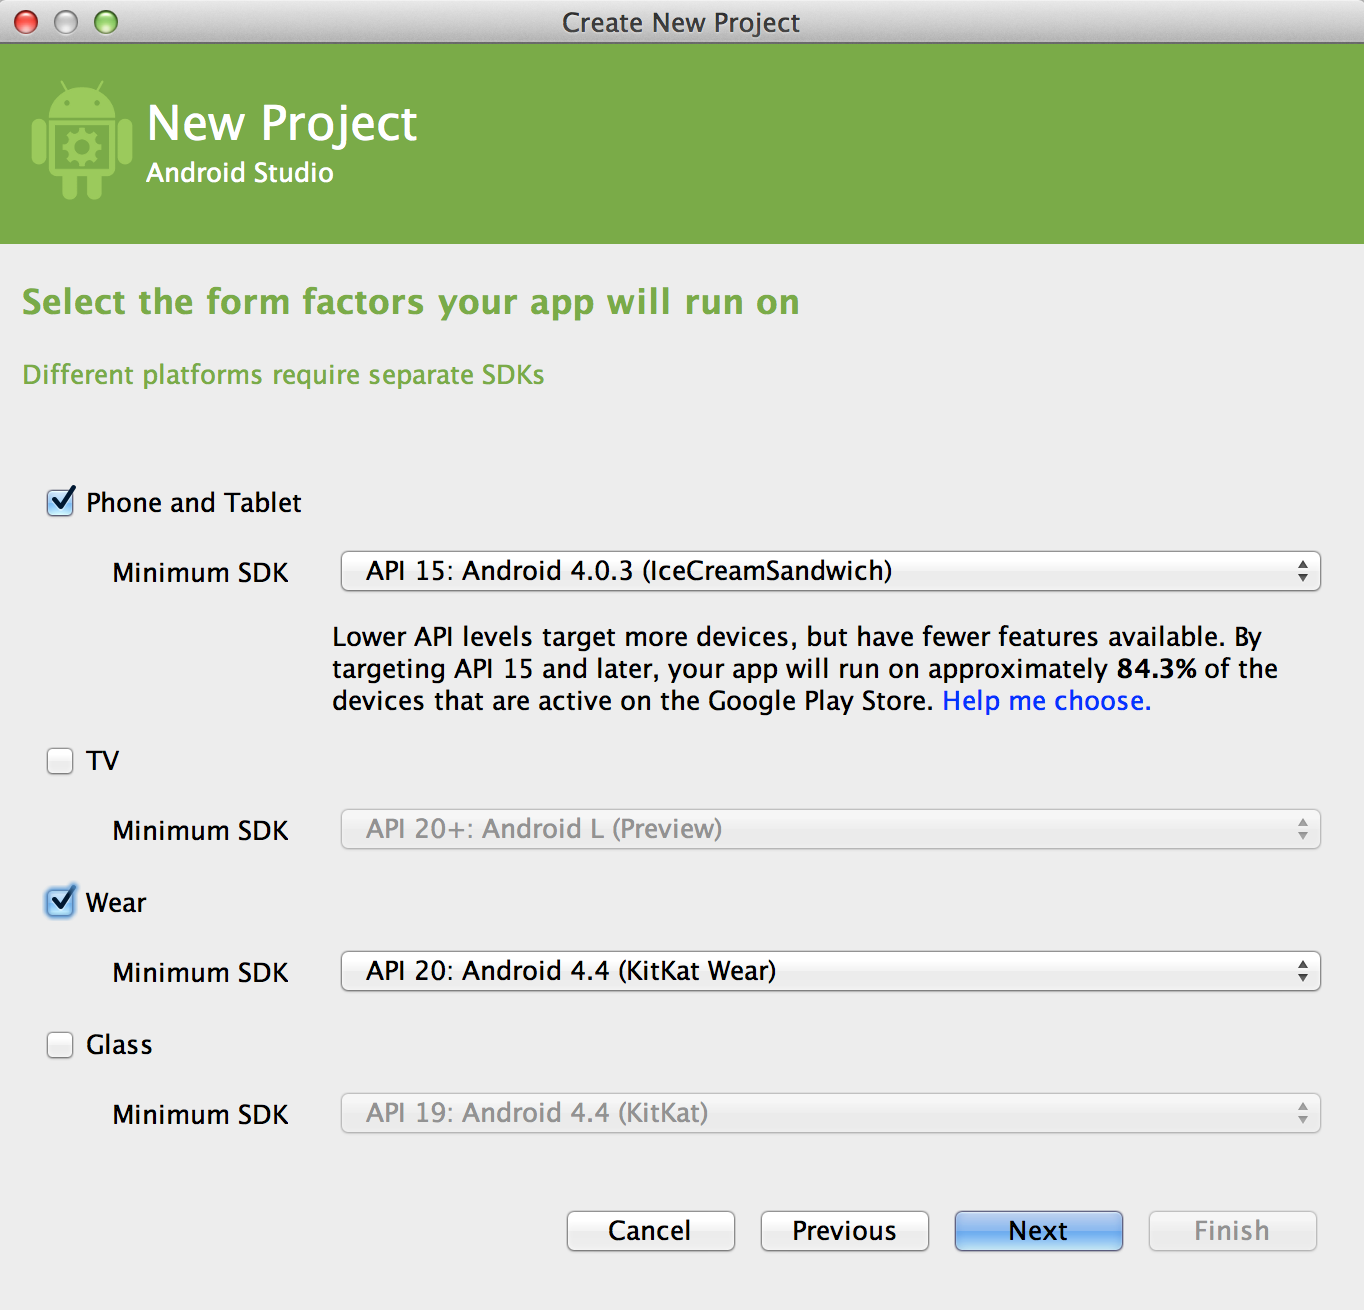
Figure 3. Choose form factors for your app.
Then, on the Form Factors Window, click Next.
Step 3: Add an Activity
The next screen lets you select an activity type to add to your app, as shown in figure 4. This screen displays a different set of activities for each of the form factors you selected earlier.
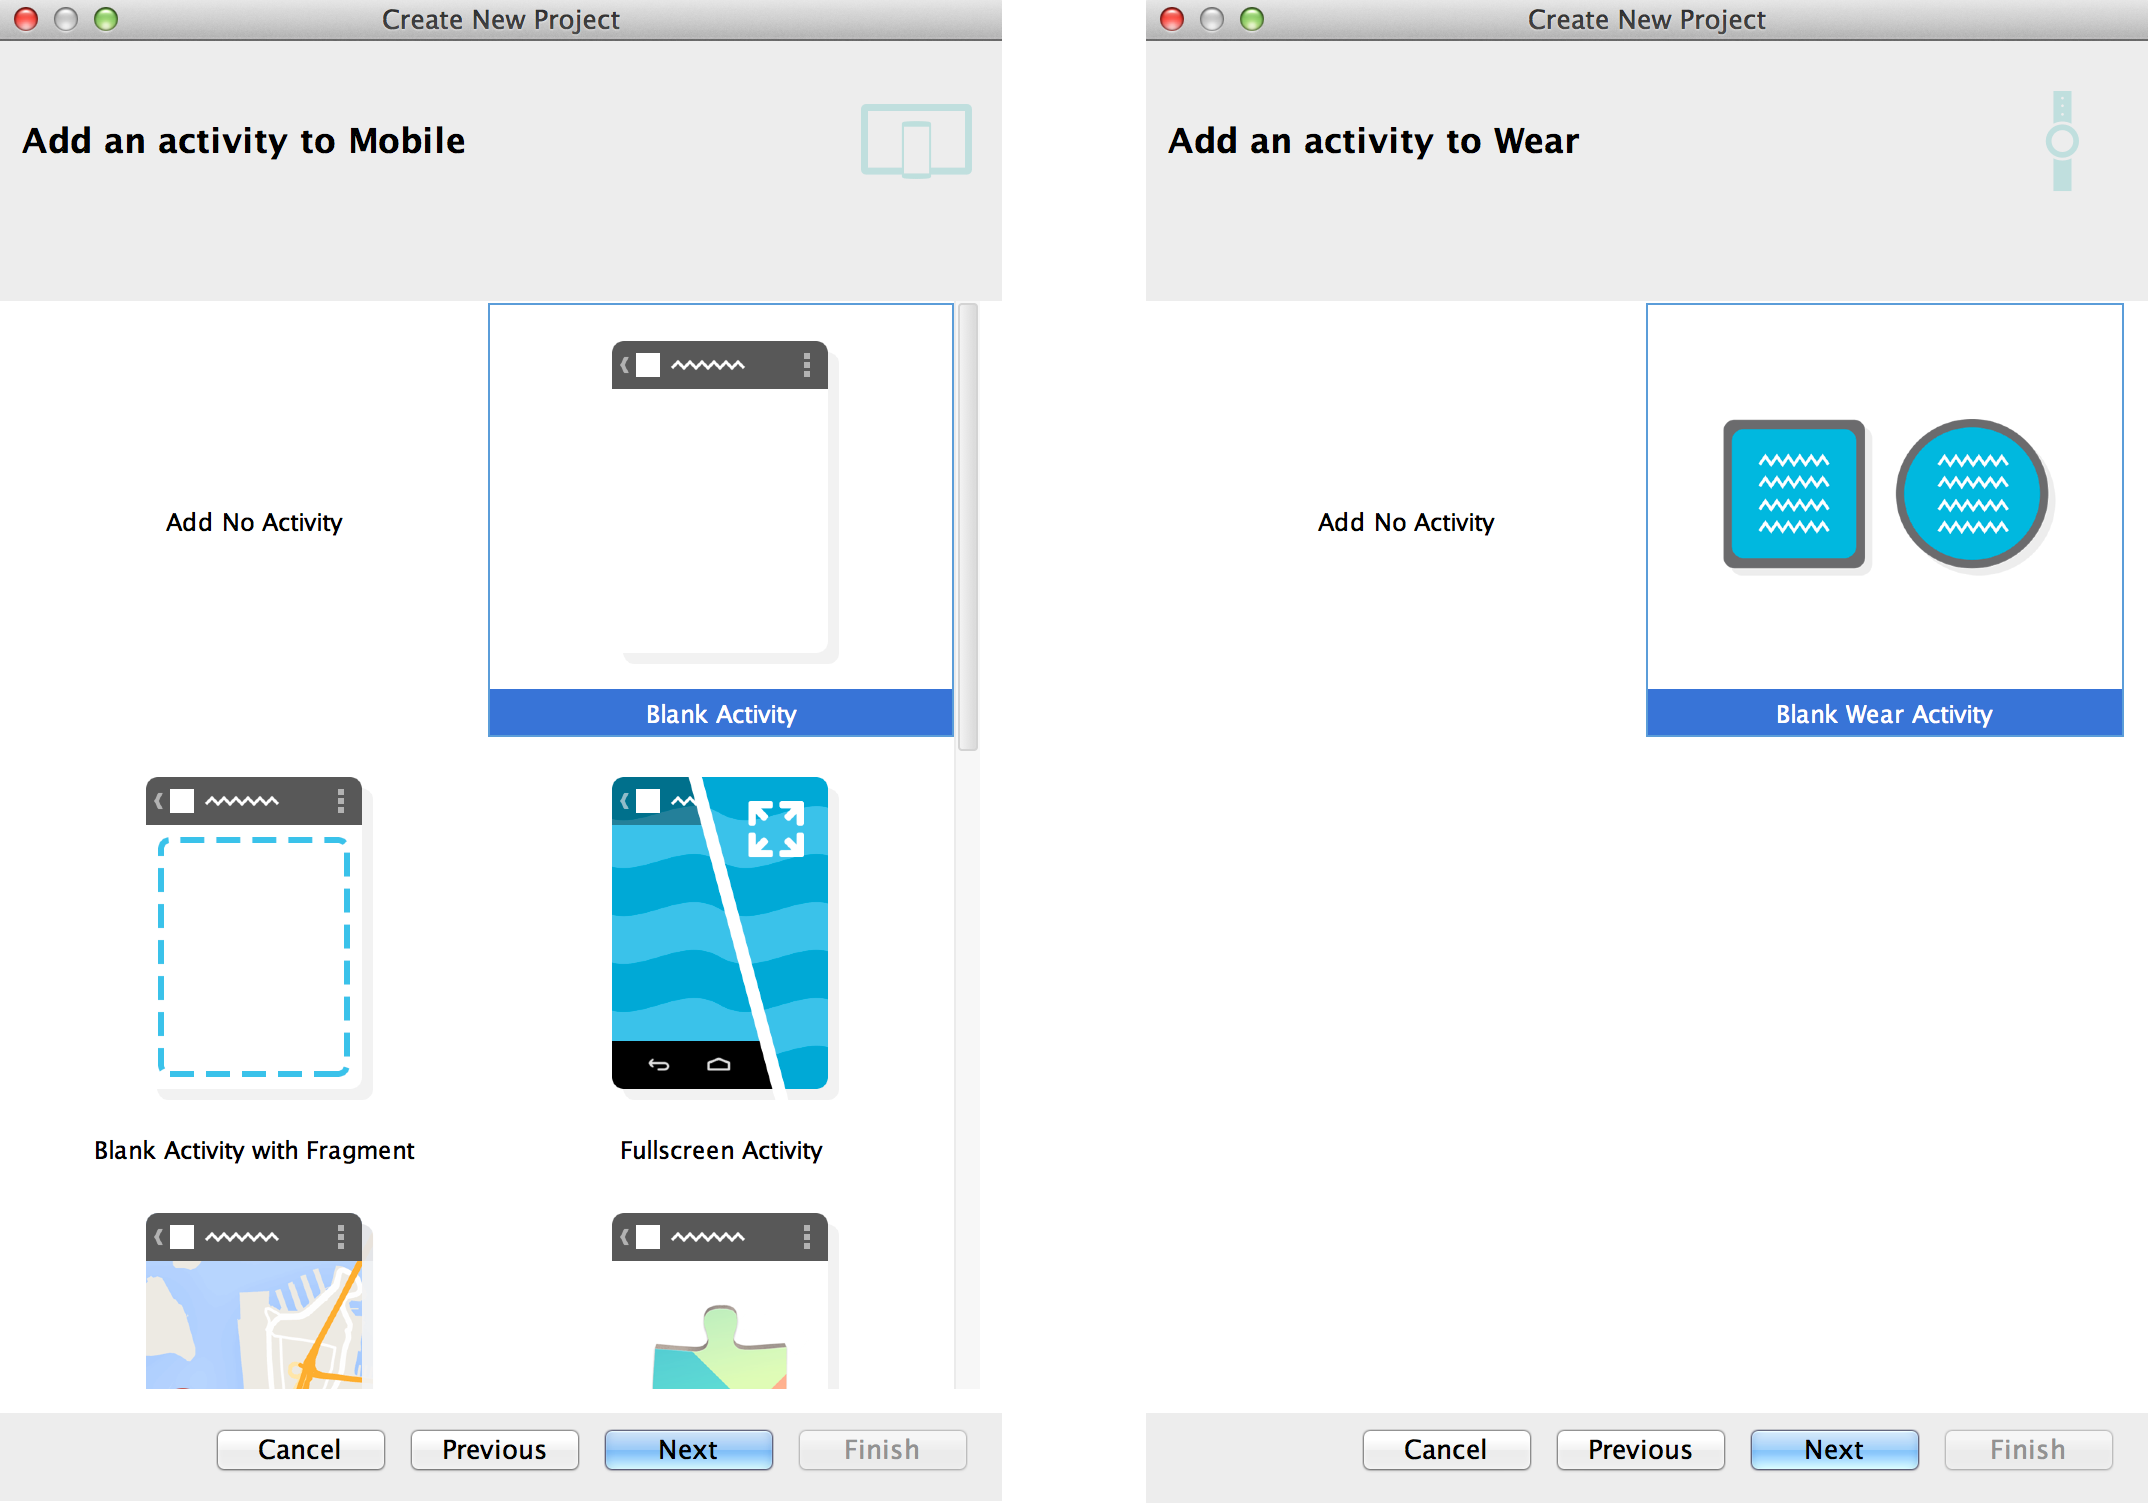
Figure 4. Add an activity to your app.
Choose an activity type then click Next.
Note: If you choose "Add No Activity", click Finish to create the project.
Step 4: Configure Your Activity
The next screen lets you configure the activity to add to your app, as shown in figure 5.
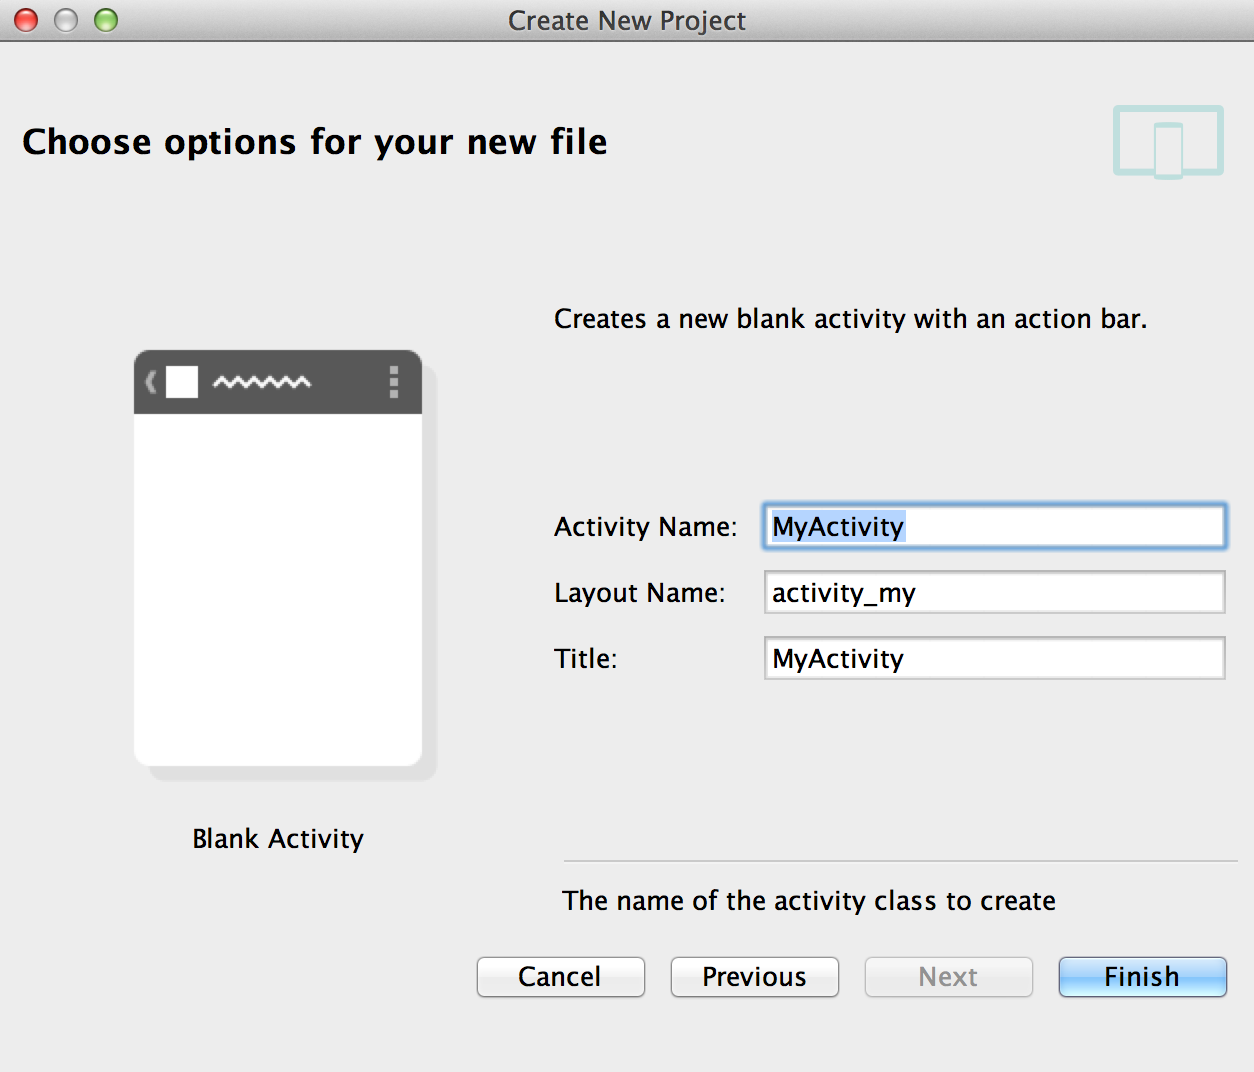
Figure 5. Choose a name for your activity.
Enter the activity name, the layout name, and the activity title. Then click Finish.
Step 5: Develop Your App
Android Studio creates the default structure for your project and opens the development environment. If your app supports more than one form factor, Android Studio creates a module folder with complete source files for each of them as shown in figure 6.
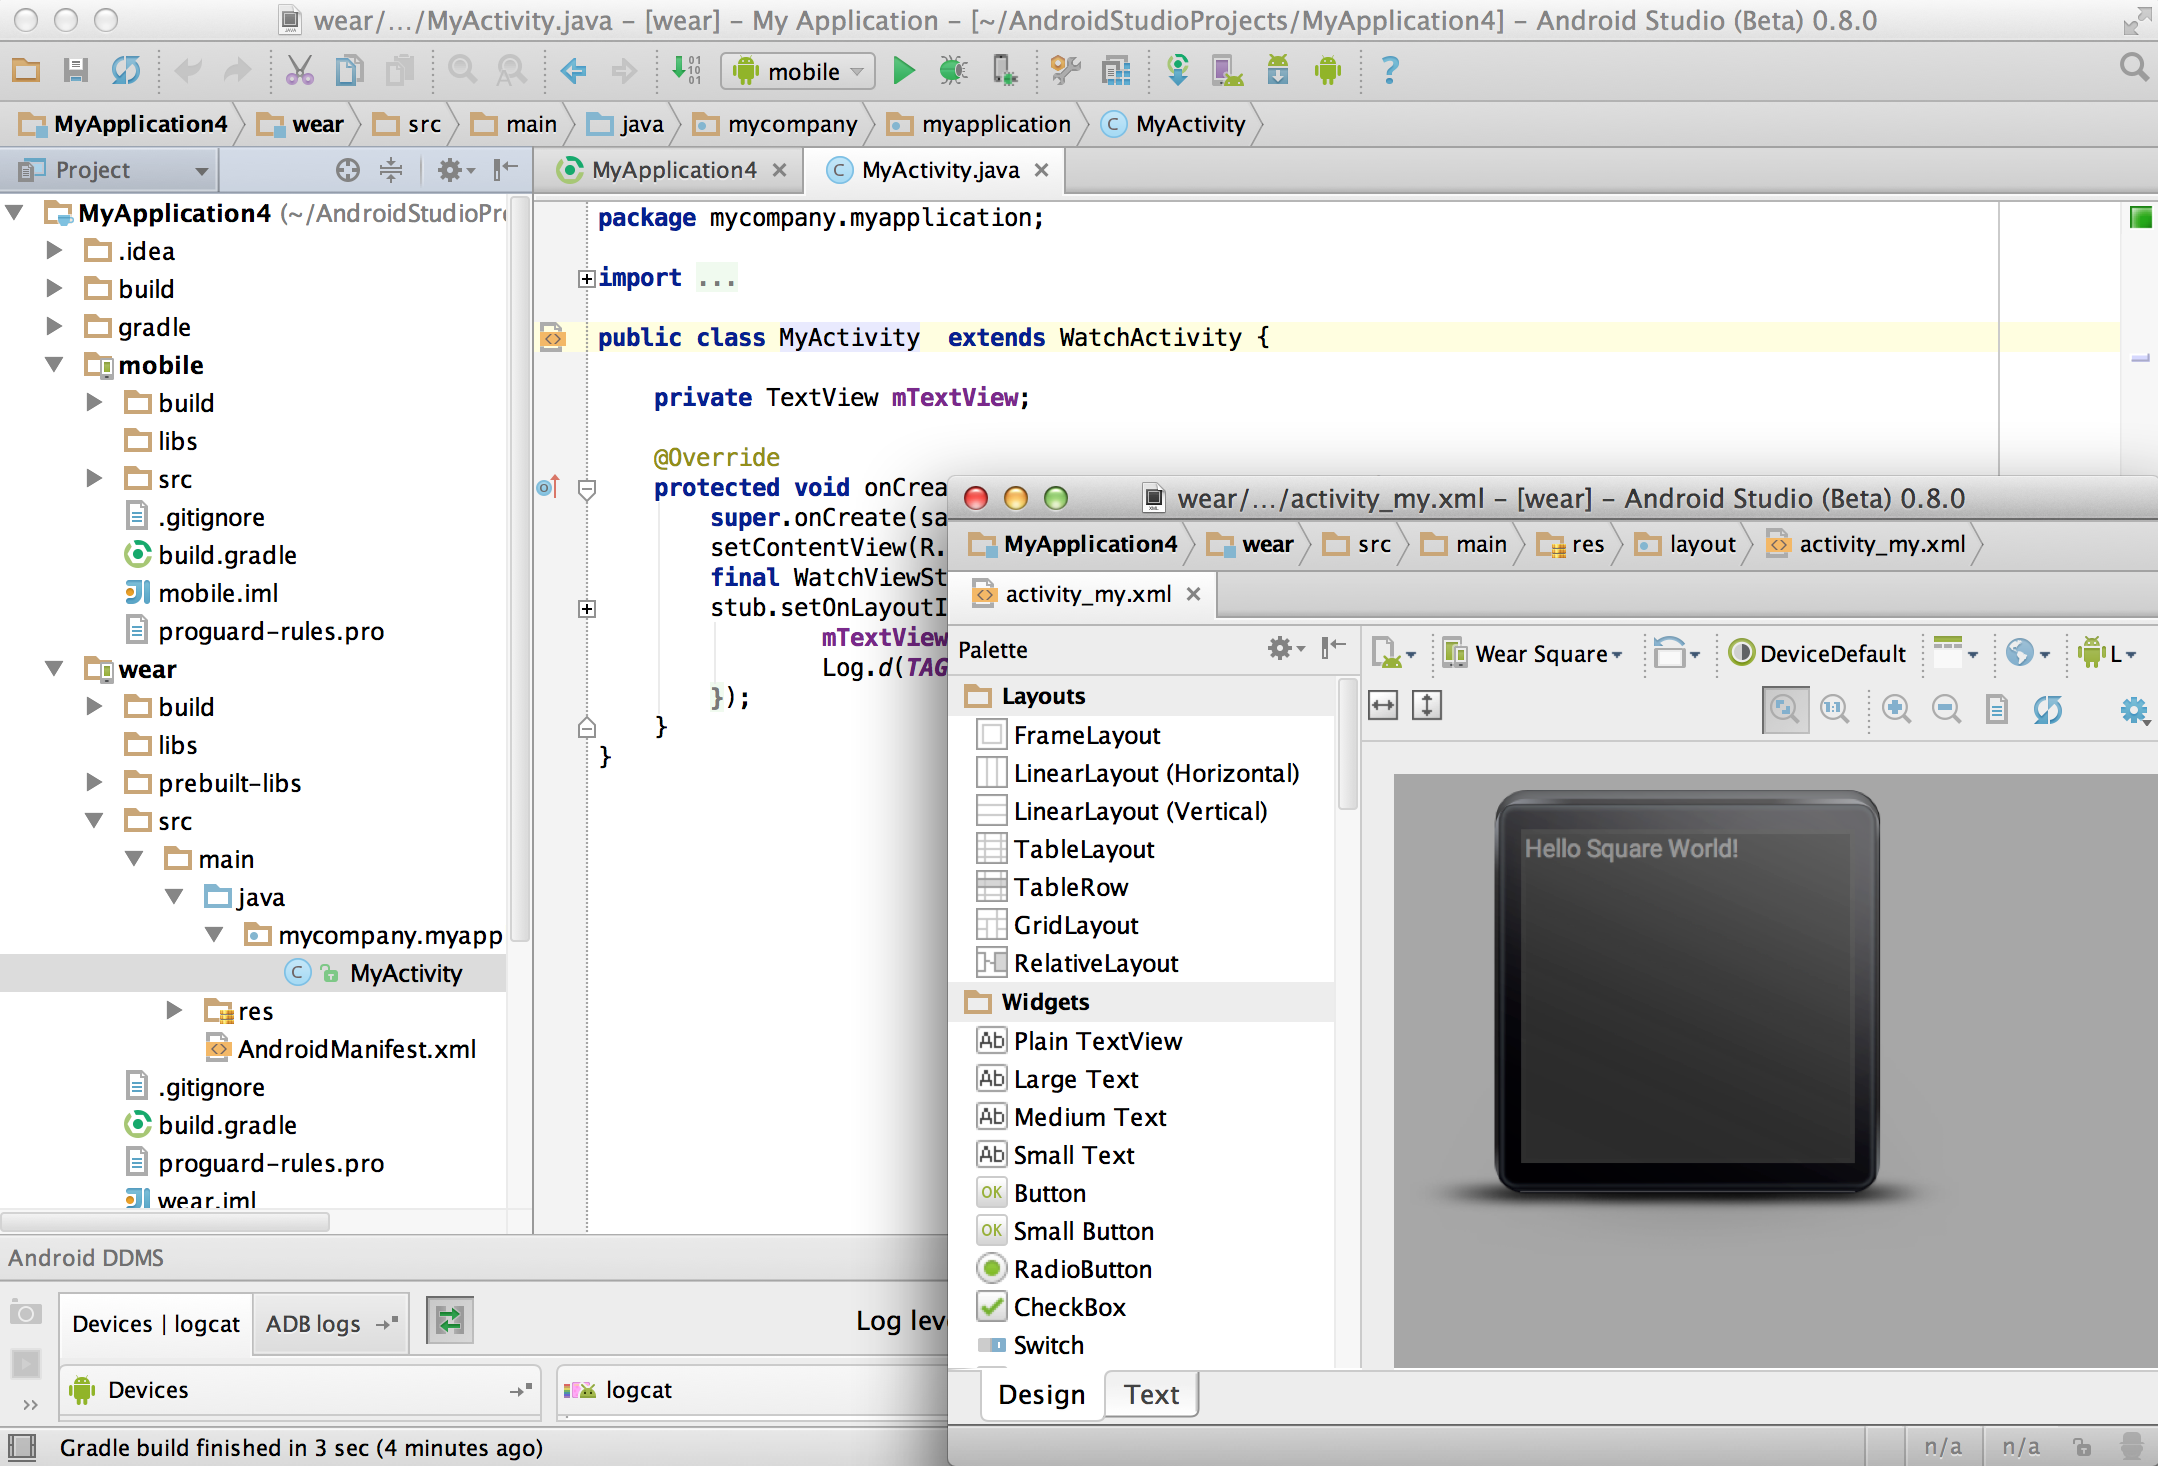
Figure 6. The default project structure for a mobile app.
Now you are ready to develop your app. For more information, see the following links:
Creating an Android Module
Android application modules contain the src/main/, AndroidManifest.xml,
build.gradle, build output and other files you need to generate your app's APK files.
Android Studio provides a New Module Wizard that you can use to quickly create a new
Android module (or a module from existing code) based on selected application settings, such as
minimum SDK level and activity template.
To create a new module, select File > New > Module. Select the desire module type then click Next to enter the basic module settings:
- Enter an Application Name. This name is used as the title of your application launcher icon when it is installed on a device.
- Enter a Module Name. This text is used as the name of the folder where your Java-based activity files are stored.
- Enter a Package Name and Package Location. This class
package namespace creates the initial
package structure for your applications code files and is added as the
packageattribute in your application's Android manifest file. This manifest value serves as the unique identifier for your application app when you distribute it to users. The package name must follow the same rules as packages in the Java programming language. - Select the Minimum required SDK.
This setting indicates the lowest version of the Android platform that your application
supports for the selected form factor. This value sets the
minSdkVersionattribute in the build.gradle file. - Select a Target SDK. This setting indicates the highest version of
Android with which you have tested with your application and sets the
targetSdkVersionattribute in your application's' build.gradle file. - Select a Compile With API version. This setting specifies what version of the SDK to compile your project against. We strongly recommend using the most recent version of the API.
- Select a Language Level API version. This setting specifies what version of the SDK to compile your project against. We strongly recommend using the most recent version of the API.
- Select a Theme. This setting specifies which standard Android visual style is applied to your application. Select activity template. For more information about Android code templates, see Using Code TemplatesLeave the Create activity option checked so you can start your application with some essential components.
- Click the check box for the required Support Libraries then click Next.
- In the Configure Launcher Icon page, create an icon and options, then click Next.
- In the Create Activity page, select activity template then click Next. For more information about Android code templates, see Using Code Templates.
- Review the new module settings then click Finish.
Note: You can manually change the minimum and target SDK for your module at any time: Double-click the module's build.gradle in the Project Explorer, set the targetSdkVersion and targetSdkVersion in the defaultConfig section.
The wizard creates a new Android application module according to the options you have chosen.
Setting up a Library Module
A library module is a standard Android module, so you can create a new one in the same way as you would a new application module, using the New Module wizard and selecting Android Library as the module type. The created library module will appear in your project view along with the other modules.
You can easily change an existing application module to a library module by changing the plugin assignment in the build.gradle file to com.android.library.
apply plugin: 'com.android.application'

android {...}
apply plugin: 'com.android.library'

android {...}
Adding a dependency on a library module
The library dependency can be declared in the module's manifest file or in the
A library modules's manifest file must declare all of the shared components that it includes, just as would a standard Android application. For more information, see the documentation for AndroidManifest.xml.
For example, the TicTacToeLib example library
project declares the activity GameActivity:
<manifest>
  ...
  <application>
    ...
    <activity android:name="GameActivity" />
    ...
  </application>
</manifest>
To add the dependency declaration to the build file, edit the build file for the app
module (app/build.gradle) and add a dependency on the lib module:
...
dependencies {
    ...
    compile project(":lib")
}
In this example, the lib module can still be built and tested independently, and
the build system creates an AAR package for it that you could reuse in other projects.
Note: The library settings in the app/build.gradle
file will override any shared library resources declared in the manifest file.
Referencing a library module
If you are developing an application and want to include the shared code or resources from a library module, you can also do so easily by adding a reference to the library module in the module's dependency page.
To add a reference to a library module, follow these steps:
- Make sure that both the module library and the application module that depends on it are in your project. If one of the modules is missing, import it into your project.
- In the project view, right-click the dependent module and select Open > Module Settings.
- Right-click the plus icon to add a new dependencies.
If you are adding references to multiple libraries, you can set their relative priority (and merge order) by selecting a library and using the Up and Down controls. The tools merge the referenced libraries with your application starting from lowest priority (bottom of the list) to highest (top of the list). If more than one library defines the same resource ID, the tools select the resource from the library with higher priority. The application itself has highest priority and its resources are always used in preference to identical resource IDs defined in libraries.
- Use the Scope drop-down to select how the dependency will be applied.
- Click Apply to create the dependency and OK to close the Project Structure window.
Android Studio rebuilds the module, including the contents of the library module the next time the project or module is built.
Declaring library components in the manifest file
In the manifest file of the application module, you must add declarations of all components
that the application will use that are imported from a library module. For example, you must
declare any <activity>, <service>,
<receiver>, <provider>, and so on, as well as
<permission>, <uses-library>, and similar elements.
Declarations should reference the library components by their fully-qualified package names, where appropriate.
For example, the TicTacToeMain example
application declares the library activity GameActivity like this:
<manifest>
  ...
  <application>
    ...
    <activity android:name="com.example.android.tictactoe.library.GameActivity" />
    ...
  </application>
</manifest>
For more information about the manifest file, see the documentation for AndroidManifest.xml.
Using the Android Project View
The Android project view in Android Studio shows a flattened version of your project's structure that provides quick access to the key source files of Android projects and helps you work with the new Gradle-based build system. The Android project view:
- Groups the build files for all modules at the top level of the project hierarchy.
- Shows the most important source directories at the top level of the module hierarchy.
- Groups all the manifest files for each module.
- Shows resource files from all Gradle source sets.
- Groups resource files for different locales, orientations, and screen types in a single group per resource type.
Use the Android Project View
The Android project view is enabled by default and shows all the build files at the top level of the project hierarchy under Gradle Scripts. The project module appears as a folder at the top level of the project hierarchy and contains these three elements at the top level:
manifests/- Manifest files for the module.java/- Source files for the module.res/- Resource files for the module.
Notice how the Android project view groups all instances of the
ic_launcher.png resource for different screen densities under the same element.
Note: The Android project view shows a hierarchy that helps you work with Android projects by providing a flattened structure that highlights the most commonly used files while developing Android applications. However, the project structure on disk differs from this representation and maintains the traditional project structure.

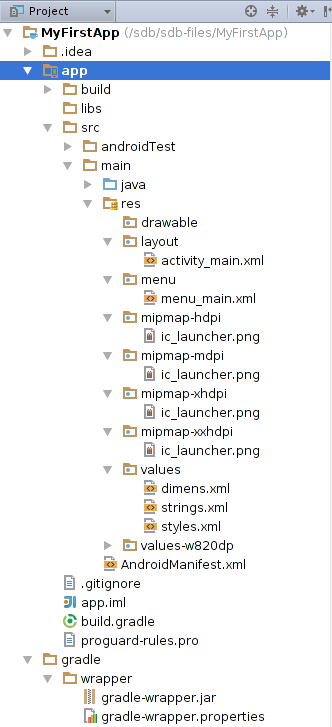
Figure 10: Android and Traditional project view