This document describes the differences between Eclipse ADT and Android Studio, including project structure, build system, debugging, and application packaging. This guide is intended to help you transition to using Android Studio as your development environment.
Project Structure
Eclipse provides workspaces as a common area for grouping related projects, configurations, and
settings. In Android Studio, each instance of Android Studio contains a top-level project with one
or more app modules. Each app module folder contains the equivalent to an Eclipse
project, the complete source sets for that module, including src/main and
src/androidTest directories, resources, build file, and the Android manifest. In general,
to update and build your app you modify the files under each module's
src/main directory for source code updates, the gradle.build file for
build specification, and the files under src/androidTest directory for test case creation.
You can also customize the view of the project files in Android Studio to focus on specific aspects of your app development:
- Packages
- Project Files
- Scratches
- Problems
- Production
- Tests
The following table shows the general mapping of the Eclipse ADT project structure and file locations to Android Studio.
Table 1. Project structure mapping.
| Eclipse ADT | Android Studio |
|---|---|
| Workspace | Project |
| Project | Module |
| Project-specific JRE | Module JDK |
| Classpath variable | Path variable |
| Project dependency | Module dependency |
| Library Module | Library |
AndroidManifest.xml |
app/src/main/AndroidManifest.xml |
assets/ |
app/src/main/assets |
res/ |
app/src/main/res/ |
src/ |
app/src/main/java/ |
tests/src/ |
app/src/androidTest/java/ |
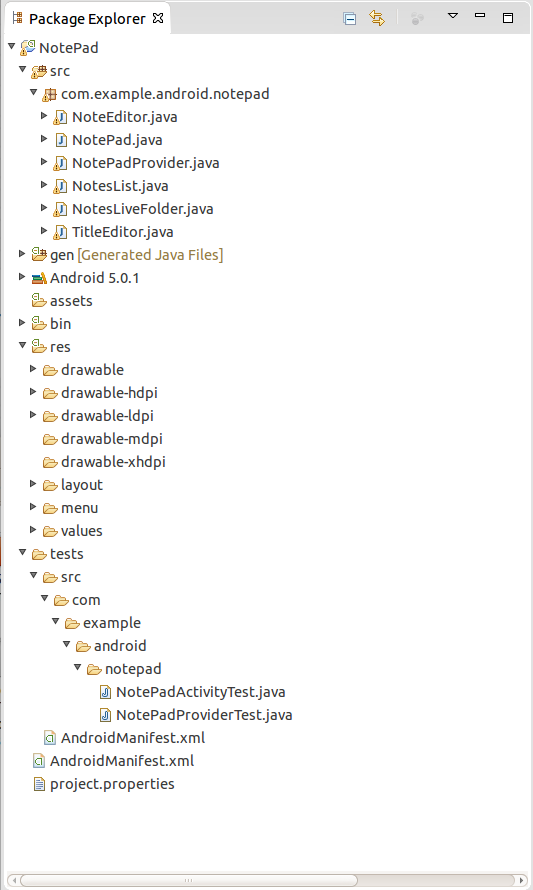
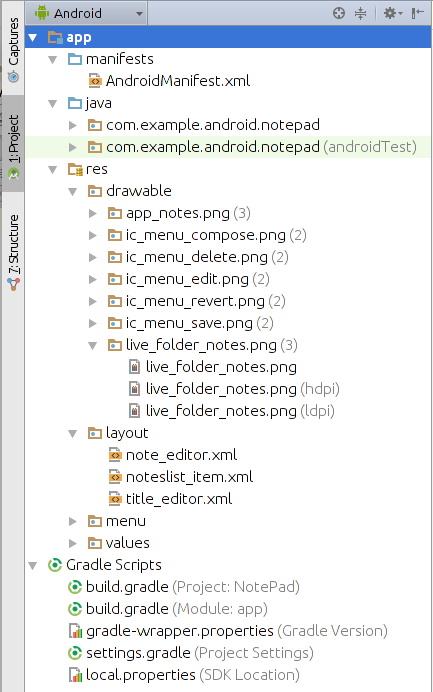
Table 2 shows Eclipse ADT and Android Studio project views.
Table 2. Comparing project views.
| Eclipse ADT | Android Studio Project View | Android Studio Android View |
|---|---|---|
 |
 |
 |
Note: Multiple instances of Android Studio can be used to develop independent projects.
Manifest Settings
Android Studio and Gradle-based builds support
build variants,
which are combinations of productFlavor and buildTypes, to customize
your build outputs. To support these custom builds, several elements in the
AndroidManifest.xml file are now properties in the defaultConfig and
productFlavors blocks in the build.gradle file. The import process
copies these manifest settings to the properties in the build.gradle file.
These properties overwrite the settings in any other manifest files as shown in table 3.
Table 3. Manifest and Gradle property settings.
| Manifest Setting | build.gradle Setting |
|---|---|
<uses-sdk
|
|
<manifest
package (Required in the default manifest file.)
|
|
Although these settings may no longer appear in the default app manifest file, they are still valid manifest entries and may still appear in manifests from older projects, imported projects, dependencies, and libraries.
The package element must still be specified in the manifest file. It is used in
your source code to refer to your R class and to resolve any relative activity/service
registrations.
Note: When multiple manifests are present in your app, for
example a library manifest and a src/main/ manifest, the build process combines
the manifest settings into a single merged manifest based on the manifest priority and
manifest merge settings. For more information about the manifest merge process and merge settings,
see
Manifest Merger.
Application ID for package identification
With the Android build system, the applicationId attribute is used to
uniquely identify application packages for publishing. The application ID is set in the
android section of the build.gradle file. This field is populated in the
build file as part of the migration process.
apply plugin: 'com.android.application'

android {
   compileSdkVersion 19
   buildToolsVersion "19.1"

   defaultConfig {
       applicationId "com.example.my.app"
       minSdkVersion 15
       targetSdkVersion 19
       versionCode 1
       versionName "1.0"
   }
 ...
Note: The applicationId is specified only in your
build.gradle file, and not in the AndroidManifest.xml file.
Build variants
enable you to uniquely identify different
packages for each product flavor and build type. The application ID in the build type setting can
be added as a suffix to the ID specified for the product flavors. The following example adds the
.debug suffix to the application ID of the pro and free
product flavors:
productFlavors {
     pro {
          applicationId = "com.example.my.pkg.pro"
     }
     free {
          applicationId = "com.example.my.pkg.free"
     }
}

buildTypes {
    debug {
          applicationIdSuffix ".debug"
    }
}
....
Dependencies
During the import process, Android Studio imports the current Eclipse ADT dependencies and
downloads any project libraries as Android Studio modules. The dependency declarations are added to
the build.gradle file. The declarations include a
dependency scope, such as
compile, to specify in which builds the dependency is included.
The following example shows how to add an external library JAR dependency so it's included in each compile:
dependencies {
    compile files('libs/*.jar')
}

android {
    ...
}
Note: Android Studio supports the Android ARchive (AAR) format for the distribution of Android library projects as dependencies. For more information, see Configuring Gradle Builds.
The import process replaces any well-known source libraries, binary libraries, and JAR files that have known Maven coordinates with Maven dependencies, so you no longer need to maintain these dependencies manually.
Android Studio enables access to Maven, JCenter, and Ivy repositories with the
repositories block in the build.gradle as a shortcut to specifying
the URL of the repository.
If there are required repositories not declared in the build.gradle file, first add
the repository to the repositories block, and then declare the dependencies in a way
that Maven, JCenter, or Ivy declare their artifacts. The following example shows how to add the
Maven repository with the guava 11.0.2 dependency using the mavenCentral() property:
repositories {
    mavenCentral()
}

android {
    ...
}

dependencies {
    compile 'com.google.guava:guava:11.0.2'
    instrumentationtestCompile 'com.squareup.fast-android:1:0.4'
}
The Android Studio project created during the import process can also re-use any dependencies on other components. These components can be external binary packages or other Gradle projects. If a dependency has dependencies of its own, those dependencies are also included in the new Android Studio project.
Note: If there were references to Eclipse ADT workspace library
files in the project.properties or .classpath files
that were not imported from the Eclipse project, you can now add dependencies to these library files
in the build.gradle file. For more information, see
Configuring Gradle Builds.
Dependency and compilation scopes
Android Studio supports compilation scopes to customize which dependencies get included in each build, for example assigning different dependencies to different build variants.
This list shows the Android Studio scope names and definitions:
- compile -
compile - run time -
package - testCompile -
AndroidTestCompile - testRuntime -
AndroidTestRunPackage - buildTypeCompile -
buildTypeCompile - productFlavorCompile -
productFlavorCompile
Note: Dependencies for library projects must be added with the
compile scope.
With the Gradle-based DSL, you can also add custom
dependency scopes, such as betaCompile file('libs/protobug.jar') to define a beta
build dependency.
The scope and compilation configuration in the build file determine the components compiled into the app, added to the compilation classpath, and packaged in the final APK file. Based on the dependency and compilation scope, different compilation configurations can be specified to include the dependencies and classpaths, for example:
compile- for the main application.androidTestCompile- for the test application.debugCompile- for the debug buildType application.releaseCompile- for the release buildType application.
Note: Because it’s not possible to build an APK that does not
have an associated buildType, the APK built from your app is always configured with
at least two dependency and compile configurations: compile and
debugCompile.
Unlike Eclipse ADT, by default Android Studio does not compile your code when there are changes. Use the File > Settings > Build, Execution, Deployment Compiler option to enable automatic compilation.
Gradle-based Build Process
Android Studio imports the Eclipse ADT Ant-based
build tasks and converts the tasks to Gradle-based build tasks.
These new build tasks include the
main assemble task and at least two outputs based on the default build types:
a debug APK and a
release APK. Each of these build tasks has its own Android build system anchor task
to facilitate building them independently:
assembleassembleDebugassembleRelease
In Android Studio, you can view all the supported build tasks in the Gradle project tab.
With the Gradle-based build system, Android Studio uses a Gradle wrapper to fully integrate the Android Plugin for Gradle. The Android Plugin for Gradle also runs independent of Android Studio. This means that with Android Studio build system your build output is always the same, whether you build your Android apps from Android Studio, from the command line on your machine, or on machines where Android Studio is not installed (such as continuous integration servers).
Unlike Eclipse ADT with dependent plugin and build updates, the build.gradle
files allow you to customize the build settings for each Android Studio module and build variant,
so the build versions can be set independently, and are not dependent on the Android Studio
or build tools versions. This makes it easy to maintain and build legacy apps along with your
current app, using build variants to generate different APKs from the same app modules, but
built with different build versions and build chains.
For more details about the Android Studio build system, see Build System Overview.
Using the Android Studio build system's declarative logic
In contrast with the XML statements in Ant build files, the Android build system and
Gradle DSL provide a declarative build language so you can
easily extend the Gradle-based build process beyond the typical XML build tasks. For example,
this build file shows how to define a custom function to inject a dynamic versionCode
in build outputs:
def getVersionCode) {
      def code = …
      return code
}

android {
    defaultConfig {
        versionCode getVersionCode()
              …
    }
}
This example shows how to append debug to your package and version names used in the
debug build variant of your app:
android {
    buildTypes {
        debug {
            packageNameSuffix ‘.debug’
            versionNameSuffix ‘-DEBUG’
              }
            beta {
                   …
            }
        }
}
You can also use the declarative DSL in the Android build system to generate custom build
versions, for example a debuggable version of your release APK. This examples adds the
debuggable true property to the release build type in the
build.gradle file to build an identical debuggable version of the release package.
android {
    buildTypes {
        debugRelease.initWith(buildTypes.release)
        debugRelease {
            debuggable true
            packageNameSuffix '.debugrelease'
            signingConfig signingConfigs.debug
        }

    }
    sourceSets.debugRelease.setRoot('src/release')
}
Debugging and Code Inspections
Using code inspection tools such as lint is a standard part of Android development. Android Studio extends lint support with additional lint checks and supports Android annotations that allow you to help detect more subtle code problems, such as null pointer exceptions and resource type conflicts. Annotations are added as metadata tags that you attach to variables, parameters, and return values to inspect method return values, passed parameters, and local variables and fields.
For more information on enabling lint inspections and running lint, see Improving Your Code with lint. For more information about using annotations, see Improving your Code with Annotations.
In addition to code inspection, Android Studio provides an integrated memory and CPU monitor view so you can more easily monitor your app's performance and memory usage to track CPU usage, find deallocated objects, locate memory leaks, and track the amount of memory the connected device is using.
Resource Optimization
After importing and building your app, Android Studio supports several Gradle-based properties to help you minimize your app's resource utilization.
Resource shrinking
In Android Studio, resource shrinking enables the automatic removal of unused resources from your packaged app and also removes resources from library dependencies if the resources are not actually used by your app.
Use the shrinkResources attribute in the buildType block in your
build.gradle file to enable resource shrinking. For example, if your application is
using Google Play services
to access Google Drive functionality, and you are not currently using
Google+ Sign In, then
this setting removes the various drawable assets for the SignInButton buttons.
Note: Resource shrinking works in conjunction with code shrinking tools, such as ProGuard.
To enable resource shrinking, update the buildTypes block in the
build.gradle file to include minifyEnabled true,
shrinkResources true, and proguardFiles settings as shown in the
following example Gradle build file.
android {
    ...

    buildTypes {
        release {
            minifyEnabled true
            shrinkResources true
            proguardFiles getDefaultProguardFile('proguard-android.txt'),
            'proguard-rules.pro'
        }
    }
}
Filtering language resources
Use the resConfig attribute in your build.gradle file
to filter the locale resources included in your packaged app. This filtering can be especially
useful when library dependencies such as appcompat-v7 and other libraries such as
google-play-services_lib are included in your app.
The following example limits the locale resources to three language settings: en,
de, and es:
apply plugin: 'android'

android {
    compileSdkVersion 22
    buildToolsVersion "22.0.1"

    defaultConfig {
        minSdkVersion 8
        targetSdkVersion 22
        versionCode 1
        versionName "1.0"
        resConfigs "en", "de", "es" //Define the included language resources.
    }
...
Filtering bundled resources
You can also use the resConfig build setting to limit the bundled resources
in any resource folder. For example, you could also add resConfigs
settings for density folders, such as mdpi or hdpi to limit the drawable
resources that are packaged in your APK file. This example limits the app's
bundled resources to medium-density (MDPI) and high-density (HDPI) resources.
android {
    defaultConfig {
        ...
        resConfigs "mdpi", "hdpi"
    }
}
For more information about screen and resource densities, see
Supporting Multiple Screens
and Supporting Different Densities.
Resource merging
With Android Studio, identical resources, such as copies of launcher and menu icons, may end up in different resource folders throughout your app. To reduce resource duplication and improve the performance of your app, Android Studio merges resources with an identical resource name, type, and qualifier into a single resource and passes the single, merged resource to the Android Asset Packaging Tool (AAPT) for distribution in the APK file.
The resource merging process looks for identical resources in the following /res/
folders:
- AAR bundles of library project dependencies
src/main/src/productFlavor/src/buildType/
Identical resources are merged in the following low to high priority order:
dependencies --> src/main/ --> src/productFlavor/ --> src/buildType/
For example, if the res/ic_menu.png file is included in both the
src/main/res/ and src/productFlavor/res/ folders, the resources are merged
so only the file with the higher priority, in this case the src/productFlavor/res/
file, is included in the APK file.
Note: Identical resources in the same source set are not merged
and instead generate a resource merge error. This can happen if the sourceSet property
in the build.gradle file is used to define multiple source sets, for example
src/main/res/ and src/main/res2/, and these folders contain identical
resources.
App Signing and ProGuard
Based on the imported Eclipse ADT app settings, Android Studio automatically sets up your app signing and maintains any ProGuard settings.
App Signing
If your app used a debug certificate in Eclipse ADT, Android Studio continues to reference that
certificate. Otherwise, the debug configuration uses the Android Studio generated
debug keystore, with a known password and a default key with a known password located in
$HOME/.android/debug.keystore. The debug build type is set to use this
debug SigningConfig automatically when you run or debug your project
from Android Studio.
In release mode, Android Studio applies the release certificate used in Eclipse ADT. If no
release certificate was located during the import process, add the release signing configuration to
the build.gradle file or use the Build > Generate Signed APK menu
option to open the Generate Signed APK Wizard. For more information about signing your app, see
Signing Your Applications.
ProGuard
If the ProGuard option is specified in the
project.properties file in the Eclipse ADT project, Android Studio imports the
ProGuard files and adds the
ProGuard settings to the
build.gradle file. ProGuard is
supported through the minifyEnabled property as shown in this example.
android {
    buildTypes {
        release {
            minifyEnabled true
            proguardFile getDefaultProguardFile('proguard-android.txt')
        }
    }

    productFlavors {
        flavor1 {
        }
        flavor2 {
            proguardFile 'some-other-rules.txt'
        }
    }
}
Android Support Repository and Google Play services Repository
While Eclipse ADT uses the Android Support Library and Google Play services Library, Android Studio replaces these libraries during the import process with the Android Support Repository and Google Repository to maintain compatible functionality and support new Android features. Android Studio adds these dependencies as Maven dependencies using the known Maven coordinates, so these dependencies do not require manual updates.
In Eclipse, in order to use a Support Library, you must modify your project's classpath dependencies within your development environment for each Support Library you want to use. In Android Studio, you no longer need to copy library sources into your own projects, you can simply declare a dependency and the library is automatically downloaded and merged into your project. This includes automatically merging in resources, manifest entries, ProGuard exclusion rules, and custom lint rules at build time.
Android Studio also supports binary library Android ARchives (AARs). AARs are a library project's main output as a combination of compiled code (as a jar file and/or native .so files) and resources (manifest, res, assets).
App Packaging
The Android build system introduces the use of the applicationId attribute to
uniquely identify application packages for publishing. The application ID is set in the
android section of the build.gradle file.
The applicationId is specified only in your build.gradle file, and
not in the
AndroidManifest.xml file. The Gradle-based build system enables you
to uniquely identify different packages for each build variant based on product flavors and build
types. You can also add the applicationIdSuffix property to the build type in the
build.gradle file to append an identifier, such as '.debug', to the application ID
generated for each product flavor.
Software Updates
Android Studio provides several levels of update and maintenance to help you keep Android Studio up-to-date based on your code-level preference:
- Canary channel: Canary builds provide bleeding edge releases and are updated about weekly. These builds do get tested, but are still subject to bugs, as these are early releases. This is not recommended for production.
- Dev channel: Dev builds are canary builds that passed initial testing and usage. They are updated roughly bi-weekly or monthly.
- Beta channel: Beta builds provide beta-quality releases for final testing and feedback before a production release.
- Stable channel: Stable builds provide stable, production-ready release versions.
Version Control
Eclipse ADT supports version control through the use of plugins, such as the EGit and Subversive plug-ins.
Android Studio supports a variety of version control systems (Git, GitHub, CVS, Mercurial, Subversion, and Google Cloud) so version control operations can continue from within Android Studio.
After importing your Eclipse ADT app into Android Studio, use the Android Studio VCS menu options to enable VCS support for the desired version control system, create a repository, import the new files into version control, and perform other version control operations.
Note: You can also use the File > Setting > Version Control menu option to setup and modify the version control settings.
Files to ignore
A number of Android Studio files are typically not added to version control as these are
temporary files or files that get overwritten with each build. These files are listed in
an exclusion file, such as .gitignore, for the project and each app module.
Typically, the following files are excluded from version control:
- .gradle
- /local.properties
- /.idea/workspace.xml
- /.idea/libraries
- .DS_Store
- /build
- /captures