Show navigation Hide navigation

Hierarchy Viewer Walkthrough

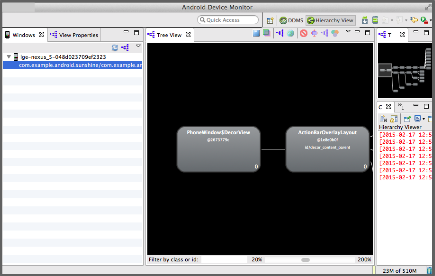
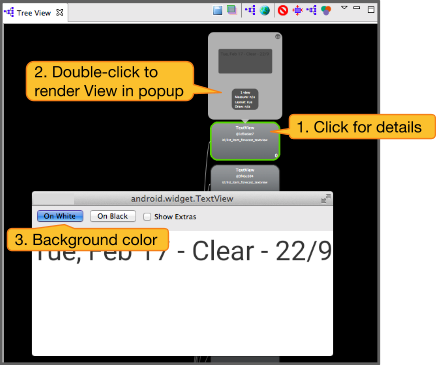
This walkthrough shows the basic usage and workflow for the Hierarchy Viewer tool.

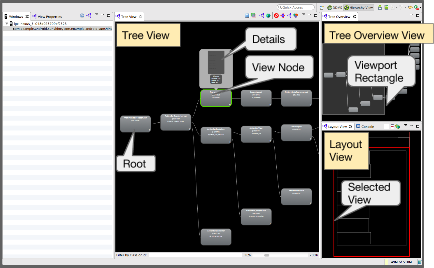
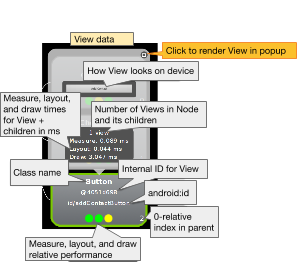
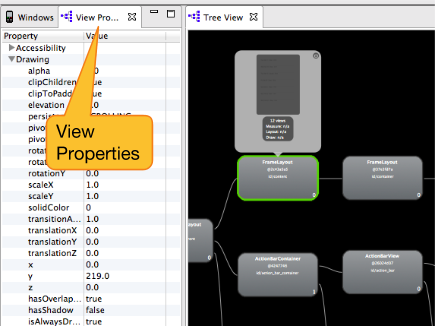
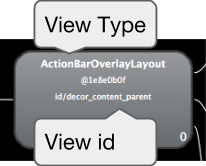
The Hierarchy Viewer tool visualizes your app's view hierarchy and profiles the relative rendering speed for each view.

What it's good for:

  • Simplifying your view hierarchy to reduce overdraw, and make it easier to manage.
  • Finding potential rendering performance bottlenecks related to the structure and shape of your view hierarchy.

Prerequisites

  • A mobile device set up to work with Hierarchy Viewer:
    1. You must have Developer Options enabled on your mobile device. You must use a physical device to get accurate measurements.
    2. Set an ANDROID_HVPROTO environment variable on the desktop machine that is connected to your device. For more information, see Device Setup for Hierarchy Viewer.
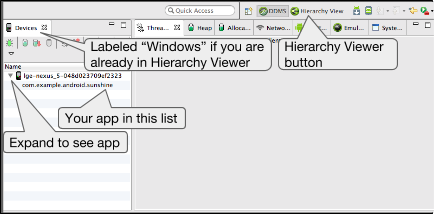
  • Debuggable app code with a view hierarchy. Use your own code, or the code for the Sunshine sample app from the Android Fundamentals Udacity course.

Working with Hierarchy Viewer

    1. Figure 1. Starting Android Device Monitor.

    2. Connect your mobile device to your computer.
    3. Open your application in Android Studio, build the source, and run it on your device.
    4. From Android Studio, start the Android Device Monitor: Tools > Android > Android Device Monitor.
    5. Allow USB Debugging on your phone (if asked).

    1. Figure 2. Android Device Monitor.

    2. Figure 2 illustrates what is initially shown in the Device Monitor tool. This varies depending on your setup.

      Make sure your device and the package for your application are showing in the Devices (DDMS mode) or Windows (Hierarchy Viewer mode) tab. You can choose Window > Reset Perspective to get back to the default arrangement.

      If the app does not appear, make sure you followed the device setup instructions, then start over at step 1.


    1. Figure 3. Changing Perspective to Hierarchy Viewer.

    2. In Android Device Monitor (ADM), in the menu bar, choose Window > Open Perspective, and in the popup click Hierarchy View.

      OR

      Click the Hierarchy View button if it's already visible.


    1. Figure 4. Hierarchy Viewer layout.

    2. If not already open, the Hierarchy View panes open.
      The example screen in Figure 4 shows an example of these panes.

    1. Figure 5. Resetting the Perspective.

    2. If you see a different window arrangement, in Android Device Manager, use Window > Reset Perspective to return to the default layout for this tutorial.

    1. Figure 6. Populated Hierarchy Viewer.

    2. Double-click your application in the Windows tab. This populates the panes with the view hierarchy of your application. This display is a static representation of the complete view hierarchy defined for the app.
    3. You can adjust the sizes of the panes and ADM will preserve your arrangement in future sessions.

    1. Figure 7. Hierarchy Viewer panes.

    2. If necessary, click the Layout View tab to hide the Console and show a wireframe of your layout. The outline of the currently selected view is red. Click an outline to select it.
    3. The rest of the panes:
      • The Tree Overview in the upper right gives you a bird's-eye view of your app's complete View Hierarchy.
      • In the Tree Overview, move the gray viewport rectangle to change what section of your hierarchy shows in the Tree View pane (in the center).
      • In the Tree View, you can drag and zoom the tree using your mouse.

    1. Figure 7. Parts of the View node display.

    2. Click on a View node to display details. Here is an annotated close-up of a node and its details.

    1. Figure 8. Location of View Properties tab.

    2. Click the View Properties tab at the top right (next to the Windows tab) to see properties of the selected View node.

    1. Figure 9. Rendering a view in a popup.

    2. Double-click a View node in the Tree View to render it in a popup window.

    1. Figure 10. Node with its type and id.

    2. Nodes in the Tree View show a Type, which indicates the View class, and an id, which is the view identifier in your code.