This section builds on the Build System Overview and Build and Running from Android Studio to show you how to use build variants based on product flavors and build types.
Build Configuration Basics
Android Studio projects contain a top-level build file and a build file for each module. The
build files are called build.gradle, and they are plain text files that use
Groovy syntax to configure the build with the elements
provided by the Android plugin for Gradle. In most cases, you only need to edit the build files
at the module level. For example, the build file for the app module in the
BuildSystemExample project looks like this:
apply plugin: 'com.android.application'

android {
    compileSdkVersion 19
    buildToolsVersion "19.0.0"

    defaultConfig {
        minSdkVersion 8
        targetSdkVersion 19
        versionCode 1
        versionName "1.0"
    }
    buildTypes {
        release {
            minifyEnabled true
            proguardFiles getDefaultProguardFile('proguard-android.txt'), 'proguard-rules.pro'
        }
    }
}

dependencies {
    compile project(":lib")
    compile 'com.android.support:appcompat-v7:19.0.1'
    compile fileTree(dir: 'libs', include: ['*.jar'])
}
apply plugin: 'com.android.application' applies the Android plugin for Gradle to this build.
This adds Android-specific build tasks to the top-level build tasks and makes the
android {...} element available to specify Android-specific build options.
android {...} configures all the Android-specific build options:
- The
compileSdkVersionproperty specifies the compilation target. The
buildToolsVersionproperty specifies what version of the build tools to use. To install several versions of the build tools, use the SDK Manager.Note: Always use a build tools version whose major revision number is higher or equal to that of your compilation target and target SDK.
The
defaultConfigelement configures core settings and entries in the manifest file (AndroidManifest.xml) dynamically from the build system. The values indefaultConfigoverride those in the manifest file.The configuration specified in the
defaultConfigelement applies to all build variants, unless the configuration for a build variant overrides some of these values.- The
buildTypeselement controls how to build and package your app. By default, the build system defines two build types: debug and release. The debug build type includes debugging symbols and is signed with the debug key. The release build type is not signed by default. In this example the build file configures the release version to use ProGuard.
The dependencies element is outside and after the android element.
This element declares the dependencies for this module. Dependencies are covered in the following
sections.
Note: When you make changes to the build files in your project, Android Studio requires a project sync to import the build configuration changes. Click Sync Now on the yellow notification bar that appears for Android Studio to import the changes.

Figure 1. Sync the project in Android Studio.
Declare dependencies
The app module in this example declares three
dependencies:
...
dependencies {
    // Module dependency
    compile project(":lib")

    // Remote binary dependency
    compile 'com.android.support:appcompat-v7:19.0.1'

    // Local binary dependency
    compile fileTree(dir: 'libs', include: ['*.jar'])
}
Each of these dependencies is described below. The build system adds all the
compile dependencies to the compilation classpath and includes them in the final
package.
Module dependencies
The app module depends on the lib module, because
MainActivity launches LibActivity1 as described in
Open an Activity from a Library Module.
compile project(":lib") declares a dependency on the lib
module of BuildSystemExample. When you build the app module,
the build system assembles and includes the lib module.
Remote binary dependencies
The app and lib modules both use the ActionBarActivity
class from the Android Support Library, so these modules depend on it.
compile 'com.android.support:appcompat-v7:19.0.1' declares a dependency on
version 19.0.1 of the Android Support Library by specifying its Maven coordinates. The Android Support
Library is available in the Android Repository package of the Android SDK. If your
SDK installation does not have this package, download and install it using the SDK Manager.
Local binary dependencies
Some modules do not use any binary dependencies from the
local file system. If you have modules that require local binary dependencies, copy the JAR
files for these dependencies into <moduleName>/libs inside your project.
compile fileTree(dir: 'libs', include: ['*.jar']) tells the build system that any
JAR file inside app/libs is a dependency and should be included in the compilation
classpath and in the final package.
For more information about dependencies in Gradle, see Dependency Management Basics in the Gradle User Guide.
Run ProGuard
The build system can run
ProGuard to obfuscate your
classes during the build process. In BuildSystemExample, modify the build file for
the app module to run ProGuard for the release build:
...
android {
    ...
    buildTypes {
        release {
            minifyEnabled true
            proguardFiles getDefaultProguardFile('proguard-android.txt'), 'proguard-rules.pro'
        }
    }
}
...
getDefaultProguardFile('proguard-android.txt') obtains the default ProGuard
settings from the Android SDK installation. Android Studio adds the module-specific rules file
proguard-rules.pro at the root of the module, where you can add custom ProGuard
rules.
Application ID for package identification
With the Android build system, the applicationId attribute is used to
uniquely identify application packages for publishing. The application ID is set in the
android section of the build.gradle file.
    apply plugin: 'com.android.application'

    android {
        compileSdkVersion 19
        buildToolsVersion "19.1"

    defaultConfig {
        applicationId "com.example.my.app"
        minSdkVersion 15
        targetSdkVersion 19
        versionCode 1
        versionName "1.0"
    }
    ...
Note: The applicationId is specified only in your
build.gradle file, and not in the AndroidManifest.xml file.
When using build variants, the build system enables you to uniquely identify different packages for each product flavors and build types. The application ID in the build type is added as a suffix to those specified for the product flavors.
   productFlavors {
        pro {
            applicationId = "com.example.my.pkg.pro"
        }
        free {
            applicationId = "com.example.my.pkg.free"
        }
    }

    buildTypes {
        debug {
            applicationIdSuffix ".debug"
        }
    }
    ....
The package name must still be specified in the manifest file. It is used in your source code to refer to your R class and to resolve any relative activity/service registrations.
package="com.example.app">
Note: If you have multiple manifests (for example, a product
flavor specific manifest and a build type manifest), the package name is optional in those manifests.
If it is specified in those manifests, the package name must be identical to the package name
specified in the manifest in the src/main/ folder.
For more information about the build files and process, see Build System Overview.
Configure signing settings
The debug and the release versions of the app differ on whether the application can be debugged on secure devices and on how the APK is signed. The build system signs the debug version with a default key and certificate using known credentials to avoid a password prompt at build time. The build system does not sign the release version unless you explicitly define a signing configuration for this build. If you do not have a release key, you can generate one as described in Signing your Applications.
Work with build variants
This section describes how the build system can help you create different versions of the same application from a single project. This is useful when you have a demo version and a paid version of your app, or if you want to distribute multiple APKs for different device configurations on Google Play.
The build system uses product flavors to create different product versions of your app. Each product version of your app can have different features or device requirements. The build system also uses build types to apply different build and packaging settings to each product version. Each product flavor and build type combination forms a build variant. The build system generates a different APK for each build variant of your app.
Build variants
This example project consists of the two default build types (debug and release) and two product flavors for app type (demo and full). For more information on advanced uses of build variants, see Build System Overview .
Product flavors
To create different product versions of your app:
- Define product flavors in the build file.
- Create additional source directories for each flavor.
- Add the flavor-specific sources to your project.
The rest of this section walks you through these steps in detail using a
BuildSystemExample project. You create two flavors of the
BuildSystemExample app, a demo flavor and a full flavor. Both flavors share
MainActivity, to which you add a new button to launch a new activity,
SecondActivity. This new activity is different for each flavor, so you simulate a
situation where the new activity would have more features in the full flavor than in the demo
flavor. At the end of the exercise, you end up with two different APKs, one for each flavor.
Define product flavors in the build file
To define two product flavors, edit the build file for the app module to add the following configuration:
...
android {
    ...
    defaultConfig { ... }
    signingConfigs { ... }
    buildTypes { ... }
    productFlavors {
        demo {
            applicationId "com.buildsystemexample.app.demo"
            versionName "1.0-demo"
        }
        full {
            applicationId "com.buildsystemexample.app.full"
            versionName "1.0-full"
        }
    }
}
...
The product flavor definitions support the same properties as the defaultConfig
element. The base configuration for all flavors is specified in defaultConfig, and each
flavor overrides any default values. The build file above uses the applicationId
property to assign a different package name to each flavor: since each flavor definition creates a
different app, they each need a distinct package name.
Note: To distribute your app using
Multiple APK Support in
Google Play, assign the same package name to all variants and give each variant a different
versionCode. To distribute different variants of your app as separate apps in Google
Play, assign a different package name to each variant.
Add additional source directories for each flavor
Now you create source folders and add a SecondActivity to each flavor. To create
the source directory structure for the demo flavor:
- On the Project panel, expand BuildSystemExample, and then expand the app directory.
- Right-click the src directory under app and select New > Directory.
- Enter "demo" as the name of the new directory and click OK.
Similarly, create the following directories:
app/src/demo/javaapp/src/demo/resapp/src/demo/res/layoutapp/src/demo/res/values
The resulting directory structure looks like figure 1.
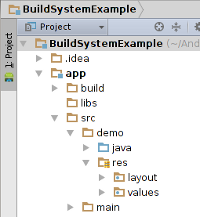
Figure 1. New source directories for the demo flavor.
Add a new activity to each flavor
To add SecondActivity to the demo flavor:
- On the Project panel, right click on the app module and select New > Activity.
- Select Blank Activity and click Next.
- Enter "SecondActivity" as the activity name.
- Enter "com.buildsystemexample.app" as the package name and click Finish.
- Right click on the java directory under app/src/demo and select New > Package.
- Enter "com.buildsystemexample.app" as the package name and click OK.
- Drag SecondActivity and drop it under the new package in app/src/demo/java.
- Accept the default values and click Refactor.
To add the layout for SecondActivity and a strings resource to the demo flavor:
- Drag activity_second.xml from app/src/main/res/layout and drop it inside app/src/demo/res/layout.
- Accept the default values on the window that appears and click
OK. - Copy strings.xml from app/src/main/res into app/src/demo/res.
Replace the contents of the new copy of
strings.xmlwith the following:<?xml version="1.0" encoding="utf-8"?> <resources> <string name="hello_world">Demo version only.</string> </resources>
Now you add source folders and SecondActivity to the full flavor by making a copy
of the demo flavor:
- On the Project panel, right click on the demo directory under app/src and select Copy.
- Right-click on the src/ directory under app/ and select Paste.
- On the window that appears, enter "full" as the new name and click OK.
Replace the contents of strings.xml under src/full/res/values with the following:
<?xml version="1.0" encoding="utf-8"?>
<resources>
    <string name="hello_world">This is the full version!</string>
</resources>
Note: From this point on, you could develop
SecondActivity independently inside each
flavor. For example, you could add more features to this activity in the full flavor.
To work on files from a particular flavor, click on Build Variants on the left of the IDE window and select the flavor you want to modify in the Build Variants panel, as shown in figure 2. Android Studio may show errors in source files from flavors other than the one selected in the Build Variants panel, but this does not affect the outcome of the build.
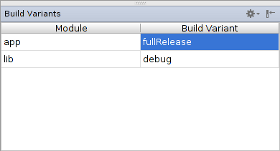
Figure 2. The Build Variants panel.
Launch a flavor-specific activity from the main activity
Since the flavor-specific activity (SecondActivity) has the same package name and
activity name in both flavors, you can launch it from the main activity, which is common to all
flavors. To modify the main activity:
Edit
activity_main.xmland add a new button toMainActivity:<LinearLayout ...> ... <Button android:id="@+id/button2" android:layout_width="wrap_content" android:layout_height="wrap_content" android:text="@string/button2" android:onClick="onButton2Clicked"/> </LinearLayout>- Click on the areas marked in red in the layout file and press Alt+
Enter. Follow the suggestions from Android Studio to add a new string
resource with value “Open Second Activity” and an
onButton2Clickedmethod toMainActivity. Add the following code to the
onButton2Clickedmethod ofMainActivity:public void onButton2Clicked(View view) { Intent intent = new Intent(this, SecondActivity.class); startActivity(intent); }Edit the app's manifest to include a reference to
SecondActivity:<manifest ...> <application ...> ... <activity android:name="com.buildsystemexample.app.SecondActivity" android:label="@string/title_activity_second" > </activity> </application> </manifest>
Build types
Build types represent the build packaging versions generated for each app package. By default, the debug and release build types are provided.
...
android {
    ...
    defaultConfig { ... }
    signingConfigs { ... }
    buildTypes { ... }
    productFlavors {...}
    buildTypes {
        release {
            minifyEnabled false
            proguardFiles getDefaultProguardFile('proguard-android.txt'), 'proguard-rules.pro'
        }
         debug {
            debuggable true
        }
    }
}
...
Note: Although only the release build type appears in the default build.gradle file, both the release and debug build types are applied to each build.
In this example, the product flavors and build types create the following build variants:
- demoDebug
- demoRelease
- fullDebug
- fullRelease
To build this example, click the Build menu option in Android Studio or invoke
the assemble task from the command line.
Note: The Build > Make Project option compiles all the source files in the entire project that have been modified since the last compilation. The Build > Rebuild Project option recomplies all the source files in the project.
Separate output folders are created for each build variant.