An Android project contains everything that defines your Android app, from app source code to build configurations and test code. The SDK tools require that your projects follow a specific structure so it can compile and package your application correctly. If you're using Android Studio, it takes care of all this for you.
A module is the first level of containment within a project that encapsulates specific types of source code files and resources. There are several types of modules with a project:
- Android Application Modules
- An Android Application Module is the container for your application's source code, resource
files, and application level settings, such as the module-level build file, resource files, and
Android Manifest file. The application module contents are eventually
built into the
.apkfile that gets installed on a device. - Test Modules
- These modules contain code to test your application projects and are built into test applications that run on a device. By default, Android Studio creates the androidTest module for inserting JUnit tests.
- Library Modules
- These modules contain shareable Android source code and resources that you can reference
in Android projects. This is useful when you have common code that you want to reuse.
Library modules cannot be installed onto a device, however, they are
pulled into the
.apkfile at build time. - App Engine Modules
- Android Studio lets you easily add a cloud backend to your application. A backend allows you to implement functionality such as backing up user data to the cloud, serving content to client apps, real-time interactions, sending push notifications through Google Cloud Messaging for Android (GCM), and more. App Engine modules are App Engine java Servlet Module for backend development, App Engine java Endpoints Module to convert server-side Java code annotations into RESTful backend APIs, and App Engine Backend with Google Cloud Messaging to send push notifications from your server to your Android devices.
When you use the Android development tools to create a new project and the module, the essential files
and folders will be created for you. There are only a handful of files and folders generated for you,
and some of them depend on whether you use Android Studio or the android tool to
generate your module. As your application grows in complexity, you might require new kinds of
resources, directories, and files.
Note: Project folders and files apply across the entire Android project and override similar module file settings.
Android Project Files
Android Studio project files and settings provide project-wide settings that apply across all modules in the project.
.idea- Directory for IntelliJ IDEA settings.
app- Application module directories and files.
build- This directory stories the build output for all project modules.
gradle- Contains the gradler-wrapper files.
.gitignore- Specifies the untracked files that Git should ignore.
build.gradle- Customizable properties for the build system. You can edit this file to specify the default build settings used by the application modules and also set the location of your keystore and key alias so that the build tools can sign your application when building in release mode. This file is integral to the project, so maintain it in a source revision control system.
gradle.properties- Project-wide Gradle settings.
gradlew- Gradle startup script for Unix.
gradlew.bat- Gradle startup script for Windows.
local.properties- Customizable computer-specific properties for the build system, such as the path to the SDK
installation. Because the content of the file is specific to the local installation of the SDK,
the
local.propertiesshould not be maintained in a source revision control system. .iml - Module file created by the IntelliJ IDEA to store module information.
settings.gradle- Specifies the sub-projects to build.
Android Application Modules
Android Application Modules are the modules that eventually get built into the .apk
files based on your build settings. They contain things such as application source code and resource
files. Most code and resource files are generated for you by default, while others should be created if
required. The following directories and files comprise an Android application module:
build/- Contains build folders for the specified build variants. Stored in the main application module.
libs/- Contains private libraries. Stored in the main application module.
src/- Contains your stub Activity file, which is stored at
src/main/java/. All other source code files (such as/ActivityName> .java.javaor.aidlfiles) go here as well. androidTest/- Contains the instrumentation tests. For more information, see the Android Test documentation.
main/java/com.>project<.>app<- Contains Java code source for the app activities.
main/jni/- Contains native code using the Java Native Interface (JNI). For more information, see the Android NDK documentation.
main/gen/- Contains the Java files generated by Android Studio, such as your
R.javafile and interfaces created from AIDL files. main/assets/- This is empty. You can use it to store raw asset files. Files that you save here are
compiled into an
.apkfile as-is, and the original filename is preserved. You can navigate this directory in the same way as a typical file system using URIs and read files as a stream of bytes using theAssetManager. For example, this is a good location for textures and game data. main/res/- Contains application resources, such as drawable files, layout files, and string values
in the following directories. See
Application Resources for more
information.
anim/- For XML files that are compiled into animation objects. See the Animation resource type.
color/- For XML files that describe colors. See the Color Values resource type.
drawable/- For bitmap files (PNG, JPEG, or GIF), 9-Patch image files, and XML files that describe Drawable shapes or Drawable objects that contain multiple states (normal, pressed, or focused). See the Drawable resource type.
mipmap/- For app launcher icons. The Android system retains the resources in this folder
(and density-specific folders such as mipmap-xxxhdpi) regardless of the screen resolution
of the device where your app is installed. This behavior allows launcher apps to pick
the best resolution icon for your app to display on the home screen. For more information
about using the
mipmapfolders, see Managing Launcher Icons as mipmap Resources. layout/- XML files that are compiled into screen layouts (or part of a screen). See the Layout resource type.
menu/- For XML files that define application menus. See the Menus resource type.
raw/- For arbitrary raw asset files. Saving asset files here is essentially the same as
saving them in the
assets/directory. The only difference is how you access them. These files are processed by aapt and must be referenced from the application using a resource identifier in theRclass. For example, this is a good place for media, such as MP3 or Ogg files. values/- For XML files that define resources by XML element type. Unlike other resources in
the
res/directory, resources written to XML files in this folder are not referenced by the file name. Instead, the XML element type controls how the resources defined within the XML files are placed into theRclass. xml/- For miscellaneous XML files that configure application components. For example, an XML
file that defines a
PreferenceScreen,AppWidgetProviderInfo, or Searchability Metadata. See Application Resources for more information about configuring these application components.
AndroidManifest.xml- The control file that describes the nature of the application and each of its components. For instance, it describes: certain qualities about the activities, services, intent receivers, and content providers; what permissions are requested; what external libraries are needed; what device features are required, what API Levels are supported or required; and others. See the AndroidManifest.xml documentation for more information
.gitignore/- Specifies the untracked files ignored by git.
app.iml/- IntelliJ IDEA module
build.gradle- Customizable properties for the build system. You can edit this file to override default build settings used by the manifest file and also set the location of your keystore and key alias so that the build tools can sign your application when building in release mode. This file is integral to the project, so maintain it in a source revision control system.
proguard-rules.pro- ProGuard settings file.
Managing Launcher Icons as mipmap Resources
Different home screen launcher apps on different devices show app launcher icons at various
resolutions. When app resource optimization techniques remove resources for unused
screen densities, launcher icons can wind up looking fuzzy because the launcher app has to upscale
a lower-resolution icon for display. To avoid these display issues, apps should use the
mipmap/ resource folders for launcher icons. The Android system
preserves these resources regardless of density stripping, and ensures that launcher apps can
pick icons with the best resolution for display.
Make sure launcher apps show a high-resolution icon for your app by moving all densities of your
launcher icons to density-specific res/mipmap/ folders
(for example res/mipmap-mdpi/ and res/mipmap-xxxhdpi/). The
mipmap/ folders replace the drawable/ folders for launcher icons. For
xxhpdi launcher icons, be sure to add the higher resolution xxxhdpi versions of the
icons to enhance the visual experience of the icons on higher resolution devices.
Note: Even if you build a single APK for all devices, it is still
best practice to move your launcher icons to the mipmap/ folders.
Manifest update
When you move your launcher icons to the mipmap-[density] folders, change the
launcher icon references in the AndroidManifest.xml file so your manifest references
the mipmap/ location. This example changes the manifest file to reference the
ic_launcher icon in the mipmap/ folder.
...
<application android:name="ApplicationTitle"
         android:label="@string/app_label"
         android:icon="@mipmap/ic_launcher" >
         ...
Library Module
Library module example code
The SDK includes an example application called TicTacToeMain that shows how a
dependent application can use code and resources from an Android Library module. The TicTacToeMain
application uses code and resources from an example library module called TicTacToeLib.
To download the sample applications and run them as modules in your environment, use the Android SDK Manager to download the "Samples for SDK API 8" (or later) module into your SDK.
For more information and to browse the code of the samples, see the TicTacToeMain application.
An Android library module is a development module that holds shared Android
source code and resources. Other Android application modules can reference the library module
and, at build time, include its compiled sources in their .apk files. Multiple
application modules can reference the same library module and any single application module
can reference multiple library modules.
Note: You need SDK Tools r14 or newer to use the new library module feature that generates each library module into its own JAR file. You can download the tools and platforms using the Android SDK Manager, as described in SDK tools help.
If you have source code and resources that are common to multiple Android projects, you can move them to a library module so that it is easier to maintain across applications and versions. Here are some common scenarios in which you could make use of library modules:
- If you are developing multiple related applications that use some of the same components, you move the redundant components out of their respective application module and create a single, reusable set of the same components in a library module.
- If you are creating an application that exists in both free and paid versions. You move the part of the application that is common to both versions into a library module. The two dependent modules, with their different package names, will reference the library module and provide only the difference between the two application versions.
Structurally, a library module is similar to a standard Android application module. For
example, it includes a manifest file at the module root, as well as src/,
res/ and similar directories. The module can contain the same types of source
code and resources as a standard Android module, stored in the same way. For example, source
code in the library module can access its own resources through its R class.
However, a library module differs from a standard Android application module in that you
cannot compile it directly to its own .apk and run it on an Android device.
Similarly, you cannot export the library module to a self-contained JAR file, as you would do
for a true library. Instead, you must compile the library indirectly, by referencing the
library in the dependent application and building that application.
When you build an application that depends on a library module, the SDK tools compile the
library into a temporary JAR file and use it in the main module, then uses the
result to generate the .apk. In cases where a resource ID is defined in both the
application and the library, the tools ensure that the resource declared in the application gets
priority and that the resource in the library module is not compiled into the application
.apk. This gives your application the flexibility to either use or redefine any
resource behaviors or values that are defined in any library.
To organize your code further, your application can add references to multiple library modules, then specify the relative priority of the resources in each library. This lets you build up the resources actually used in your application in a cumulative manner. When two libraries referenced from an application define the same resource ID, the tools select the resource from the library with higher priority and discard the other.
Once you have added references to library modules to your Android application module, you can set their relative priority. At build time, the libraries are merged with the application one at a time, starting from the lowest priority to the highest.
Library modules can reference other library modules and can import an external library (JAR) in the normal way.
Development considerations
As you develop your library modules and dependent applications, keep the points listed below in mind:
Resource conflicts
Since the tools merge the resources of a library module with those of a dependent application module, a given resource ID might be defined in both modules. In this case, the tools select the resource from the application, or the library with highest priority, and discard the other resource. As you develop your applications, be aware that common resource IDs are likely to be defined in more than one project and will be merged, with the resource from the application or highest-priority library taking precedence.
Use prefixes to avoid resource conflicts
To avoid resource conflicts for common resource IDs, consider using a prefix or other consistent naming scheme that is unique to the module (or is unique across all project modules).
You cannot export a library module to a JAR file
A library cannot be distributed as a binary file (such as a JAR file). This will be added in a future version of the SDK Tools.
A library module can include a JAR library
You can develop a library module that itself includes a JAR library; however you need to manually edit the dependent application modules's build path and add a path to the JAR file.
A library module can depend on an external JAR library
You can develop a library module that depends on an external library (for example, the Maps external library). In this case, the dependent application must build against a target that includes the external library (for example, the Google APIs Add-On). Note also that both the library module and the dependent application must declare the external library in their manifest files, in a
<uses-library>element.-
Library modules cannot include raw assets
The tools do not support the use of raw asset files (saved in the
assets/directory) in a library module. Any asset resources used by an application must be stored in theassets/directory of the application module itself. However, resource files saved in theres/directory are supported. Platform version must be lower than or equal to the Android module
A library is compiled as part of the dependent application module, so the API used in the library module must be compatible with the version of the Android library used to compile the application module. In general, the library module should use an API level that is the same as — or lower than — that used by the application. If the library module uses an API level that is higher than that of the application, the application module will not compile. It is perfectly acceptable to have a library that uses the Android 1.5 API (API level 3) and that is used in an Android 1.6 (API level 4) or Android 2.1 (API level 7) module, for instance.
-
No restriction on library module names
There is no requirement for the package name of a library to be the same as that of applications that use it.
Each library module creates its own R class
When you build the dependent application modules, library modules are compiled and merged with the application module. Each library has its own
Rclass, named according to the library's package name. TheRclass generated from main module and the library module is created in all the packages that are needed including the main module's package and the libraries' packages.Library module storage location
There are no specific requirements on where you should store a library module, relative to a dependent application module, as long as the application module can reference the library module by a relative link. What is important is that the main module can reference the library module through a relative link.
Test Projects
Test projects contain Android applications that you write using the Testing and Instrumentation framework. The framework is an extension of the JUnit test framework and adds access to Android system objects.
The test projects are now automatically part of the app source folder. When a new application
module is created, Android Studio creates the src/androidTest source set. This
source set contains tests for the default configuration and is combined with the debug
build type to generate a test application.
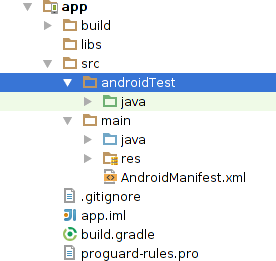
Figure 1. androidTest Folder.
Note: The src/androidTest source set may not be
created for every type of available module template. If this source set is not created, you
can just create it for that module.
For each product flavor, create a test folder specific to that product flavor.
src/main/src/androidTest/src/productFlavor1/src/testproductFlavor1/src/productFlavor2/src/testproductFlavor2/
The test manifests are always generated so a manifest in a test source set is optional.
The test applications run against the debug build type. This can be configured
using the testBuildType property in the build file.
For more information, see the Testing section.
Testing a Library Module
There are two recommended ways of setting up testing on code and resources in a library module:
- You can set up a test module that instruments an application module that depends on the library module. You can then add tests to the module for library-specific features.
- You can set up a standard application module that depends on the library and put the instrumentation in that module. This lets you create a self-contained module that contains both the tests/instrumentations and the code to test.