This lesson teaches you to
- Specify the Actions in XML
- Add the Actions to the Action Bar
- Respond to Action Buttons
- Add Up Button for Low-level Activities
You should also read
The action bar allows you to add buttons for the most important action items relating to the app's current context. Those that appear directly in the action bar with an icon and/or text are known as action buttons. Actions that can't fit in the action bar or aren't important enough are hidden in the action overflow.
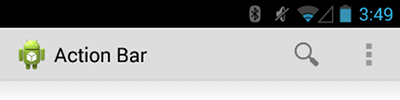
Figure 1. An action bar with an action button for Search and the action overflow, which reveals additional actions.
Specify the Actions in XML
All action buttons and other items available in the action overflow are defined
in an XML menu resource. To add
actions to the action bar, create a new XML file in your project's
res/menu/ directory.
Add an <item> element for each item you want to include in the action bar.
For example:
res/menu/main_activity_actions.xml
<menu xmlns:android="http://schemas.android.com/apk/res/android" >
    <!-- Search, should appear as action button -->
    <item android:id="@+id/action_search"
          android:icon="@drawable/ic_action_search"
          android:title="@string/action_search"
          android:showAsAction="ifRoom" />
    <!-- Settings, should always be in the overflow -->
    <item android:id="@+id/action_settings"
          android:title="@string/action_settings"
          android:showAsAction="never" />
</menu>
Download action bar icons
To best match the Android iconography guidelines, you should use icons provided in the Action Bar Icon Pack.
This declares that the Search action should appear as an action button when room is available in the action bar, but the Settings action should always appear in the overflow. (By default, all actions appear in the overflow, but it's good practice to explicitly declare your design intentions for each action.)
The icon attribute requires a resource ID for an
image. The name that follows @drawable/ must be the name of a bitmap image you've
saved in your project's res/drawable/ directory. For example,
"@drawable/ic_action_search" refers to ic_action_search.png.
Likewise, the title attribute uses a string resource that's defined by an XML
file in your project's res/values/ directory, as discussed in Building a Simple User
Interface.
Note: When creating icons and other bitmap images for your app, it's important that you provide multiple versions that are each optimized for a different screen density. This is discussed more in the lesson about Supporting Different Screens.
If your app is using the Support Library for compatibility on versions
as low as Android 2.1, the showAsAction attribute is not available from
the android: namespace. Instead this attribute is provided by the Support Library
and you must define your own XML namespace and use that namespace as the attribute prefix.
(A custom XML namespace should be based on your app name, but it can be any
name you want and is only accessible within the scope of the file in which you declare it.)
For example:
res/menu/main_activity_actions.xml
<menu xmlns:android="http://schemas.android.com/apk/res/android"
      xmlns:yourapp="http://schemas.android.com/apk/res-auto" >
    <!-- Search, should appear as action button -->
    <item android:id="@+id/action_search"
          android:icon="@drawable/ic_action_search"
          android:title="@string/action_search"
          yourapp:showAsAction="ifRoom"  />
    ...
</menu>
Add the Actions to the Action Bar
To place the menu items into the action bar, implement the
onCreateOptionsMenu() callback
method in your activity to inflate the menu resource into the given Menu
object. For example:
@Override
public boolean onCreateOptionsMenu(Menu menu) {
    // Inflate the menu items for use in the action bar
    MenuInflater inflater = getMenuInflater();
    inflater.inflate(R.menu.main_activity_actions, menu);
    return super.onCreateOptionsMenu(menu);
}
Respond to Action Buttons
When the user presses one of the action buttons or another item in the action overflow,
the system calls your activity's onOptionsItemSelected() callback method. In your implementation of this method,
call getItemId() on the given MenuItem to
determine which item was pressed—the returned ID matches the value you declared in the
corresponding <item> element's android:id attribute.
@Override
public boolean onOptionsItemSelected(MenuItem item) {
    // Handle presses on the action bar items
    switch (item.getItemId()) {
        case R.id.action_search:
            openSearch();
            return true;
        case R.id.action_settings:
            openSettings();
            return true;
        default:
            return super.onOptionsItemSelected(item);
    }
}
Add Up Button for Low-level Activities

Figure 4. The Up button in Gmail.
All screens in your app that are not the main entrance to your app (activities that are not the "home" screen) should offer the user a way to navigate to the logical parent screen in the app's hierarchy by pressing the Up button in the action bar.
When running on Android 4.1 (API level 16) or higher, or when using ActionBarActivity from the Support Library, performing Up
navigation simply requires that you declare the parent activity in the manifest file and enable
the Up button for the action bar.
For example, here's how you can declare an activity's parent in the manifest:
<application ... >
    ...
    <!-- The main/home activity (it has no parent activity) -->
    <activity
        android:name="com.example.myfirstapp.MainActivity" ...>
        ...
    </activity>
    <!-- A child of the main activity -->
    <activity
        android:name="com.example.myfirstapp.DisplayMessageActivity"
        android:label="@string/title_activity_display_message"
        android:parentActivityName="com.example.myfirstapp.MainActivity" >
        <!-- Parent activity meta-data to support 4.0 and lower -->
        <meta-data
            android:name="android.support.PARENT_ACTIVITY"
            android:value="com.example.myfirstapp.MainActivity" />
    </activity>
</application>
Then enable the app icon as the Up button by calling
setDisplayHomeAsUpEnabled():
@Override
public void onCreate(Bundle savedInstanceState) {
    super.onCreate(savedInstanceState);
    setContentView(R.layout.activity_displaymessage);

    getSupportActionBar().setDisplayHomeAsUpEnabled(true);
    // If your minSdkVersion is 11 or higher, instead use:
    // getActionBar().setDisplayHomeAsUpEnabled(true);
}
Because the system now knows MainActivity is the parent activity for
DisplayMessageActivity, when the user presses the
Up button, the system navigates to
the parent activity as appropriate—you do not need to handle the
Up button's event.
For more information about up navigation, see Providing Up Navigation.