This lesson teaches you to
You should also read
Confirmations in Android Wear apps use the whole screen or a larger portion of it than those in handheld apps. This ensures that users can see these confirmations by just glancing at the screen and that they have large enough touch targets to cancel an action.
The Wearable UI Library helps you show confirmation animations and timers in your Android Wear apps:
- Confirmation timers
- Automatic confirmation timers show users an animated timer that lets them cancel an action they just performed.
- Confirmation animations
- Confirmation animations give users visual feedback when they complete an action.
The following sections show you how to implement these patterns.
Use Automatic Confirmation Timers
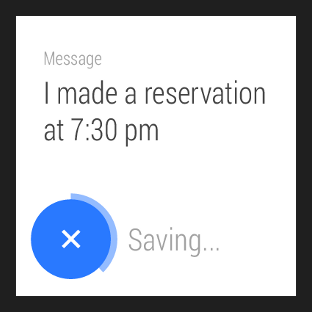
Figure 1: A confirmation timer.
Automatic confirmation timers let users cancel an action they just performed. When the user performs the action, your app shows a button to cancel the action with a timer animation and starts the timer. The user has the option to cancel the action until the timer finishes. Your app gets notified if the user cancels the action and when the timer expires.
To show a confirmation timer when users complete an action in your app:
- Add a
<DelayedConfirmationView>element to your layout. - Implement the
DelayedConfirmationListenerinterface in your activity. - Set the duration of the timer and start it when the user completes an action.
Add the
<DelayedConfirmationView>
element to your layout as follows:
<android.support.wearable.view.DelayedConfirmationView
    android:id="@+id/delayed_confirm"
    android:layout_width="40dp"
    android:layout_height="40dp"
    android:src="@drawable/cancel_circle"
    app:circle_border_color="@color/lightblue"
    app:circle_border_width="4dp"
    app:circle_radius="16dp">
</android.support.wearable.view.DelayedConfirmationView>
You can assign a drawable resource to display inside the circle with the
android:src attribute and configure the parameters of the circle directly on the
layout definition.
To be notified when the timer finishes or when users tap on it, implement the corresponding listener methods in your activity:
public class WearActivity extends Activity implements
                           DelayedConfirmationView.DelayedConfirmationListener {

    private DelayedConfirmationView mDelayedView;

    @Override
    protected void onCreate(Bundle savedInstanceState) {
        super.onCreate(savedInstanceState);
        setContentView(R.layout.activity_wear_activity);

        mDelayedView =
                (DelayedConfirmationView) findViewById(R.id.delayed_confirm);
        mDelayedView.setListener(this);
    }

    @Override
    public void onTimerFinished(View view) {
        // User didn't cancel, perform the action
    }

    @Override
    public void onTimerSelected(View view) {
        // User canceled, abort the action
    }
}
To start the timer, add the following code to the point in your activity where users select an action:
// Two seconds to cancel the action
mDelayedView.setTotalTimeMs(2000);
// Start the timer
mDelayedView.start();
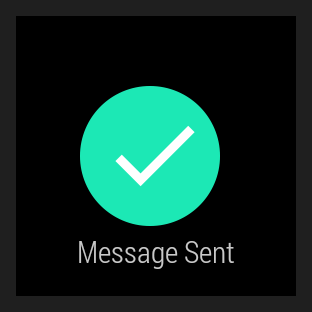
Figure 2: A confirmation animation.
Show Confirmation Animations
To show a confirmation animation when users complete an action in your app, create an intent
that starts
ConfirmationActivity
from one of your activities. You can specify
one of the these animations with the
EXTRA_ANIMATION_TYPE
intent extra:
You can also add a message that appears under the confirmation icon.
To use the
ConfirmationActivity
in your app, first declare this activity in your manifest file:
<manifest>
  <application>
    ...
    <activity
        android:name="android.support.wearable.activity.ConfirmationActivity">
    </activity>
  </application>
</manifest>
Then determine the result of the user action and start the activity with an intent:
Intent intent = new Intent(this, ConfirmationActivity.class);
intent.putExtra(ConfirmationActivity.EXTRA_ANIMATION_TYPE,
                ConfirmationActivity.SUCCESS_ANIMATION);
intent.putExtra(ConfirmationActivity.EXTRA_MESSAGE,
                getString(R.string.msg_sent));
startActivity(intent);
After showing the confirmation animation,
ConfirmationActivity
finishes and your activity resumes.